
We spend a lot of time discussing exterior car care on our AvalonKing blog. But, what about the inside of your ride – it still needs love too, right? It certainly does. And one of the biggest pain in the butt interior detailing projects is cleaning floor mats with stains.
Whether you’ve got carpeted floor mats, or they are made from plastic, rubber, or that miracle substance from WeatherTech, keeping the floor mats of your car clean and free of debris is a challenge.
While having a few napkins in the glove box is great for those emergency nose bleeds, they really don’t do the trick of cleaning messes from floor mats.
So, in today’s blog, we’ll dive into a few proven methods for cleaning your cars floor mats.
What Type of Car Mats Can Be Cleaned?
Car mats are designed to provide an extra layer of protection for the factory interior carpet. They are either offered by the factory as a standard inclusion or can be purchased from dealerships as an accessory. You can also purchase a lot of these floor mats for cars online from aftermarket manufacturers.
Here is the type of mats that can be cleaned with some household supplies and a bit of elbow grease.
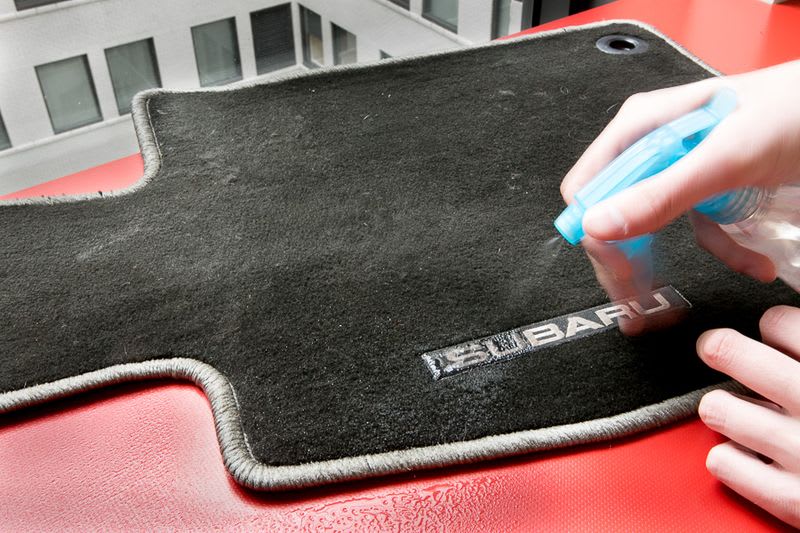
Fabric Floor Mats
The cheapest and most common floor mat are those made from fabric – similar with the same carpeted upholstery on the floor of your ride. It’s basically an extra layer of the same material that are either decorated with accent colors, branding, logos, or other enhancements.
Rubber Floor Mats
The next level up from fabric mats are those made from rubber or hard plastic. This is typically an upgraded offering from the dealership, especially those living in cold or wet weather climates. They are non-slip material, which improves driving safety, and are textured to soak in water or mud. Most of these are offered in black, so they can get dirty quickly.
All Weather Vinyl Mats
You typically see these offered as aftermarket products. They are more durable than factory rubber mats and are more fashionable. You’ll find these designed with an elevated edge, so that water or debris does not fall off the mat and onto the floorboard of your vehicle. The material is a very strong vinyl and are made to last.
Nomad Floor Mats
This is a recent entry from the good folks at 3M. It’s a proprietary surface material that is intended to soak up grease, grime, water, and anything else you spill inside the vehicle. They don’t require cleaning as often as others mentioned above.
How to Clean Car Mats for Your Car
Believe it or not, cleaning your cars floor mats is easier than you’d think. The key is knowing the difference between materials, and following the steps recommended for those type of mats.
However, if you’ve got aftermarket floor mats – like those offered through WeatherTech – it’s CRUCIAL to follow their exact steps for cleaning. If you don’t, it will void warranties. And since we don’t sell those products, we’re not authorized to give you those steps.
So, let’s start with steps for cleaning rubber and cloth floor mats – as those are the most common.
How to Clean Rubber Car Floor Mats
The key to cleaning rubber car floor mats is gathering your supplies first. For this project, we’ll keep it simple. Here is what you’ll need.
- Your arms and hands to shake off the mats. Of course, you could use a stick if you’d like
- Car washing shampoo – pH neutral is best
- A Microfiber Wash Mitt – a Wash Mitt that is big with noodle ends is your optimal solution
- A bucket for soapy water
- A hose to rinse off
Rubber mats will air dry rather easily, but if you have an old towel, that will help. I like to use compressed air to blow them off – especially if they have creases that can trap water.

Here are the steps:
Step 1 – Remove from your vehicle
It’s quite common for car owners to do things quickly and conveniently. But, to really wash any floor mats, you need to remove them from the vehicle first.
Step 2 – Remove Loose Debris from the Rubber Mats
There are a couple of ways to accomplish this. You can simply use your hands to shake them off, vacuum the ‘stuff’ off with a shop-vac, or even beat it with a stick.
Step 3 – Place the Mats on Concrete
When all the loose debris and dirt of off the rubber mats, place them on a clean and solid surface, like concrete in your driveway for example. You don’t want to wash mats in grass, as you’ll just get them dirty with loose grass.
Step 4 – Pre-Rinse with Water
After you’ve got a clean place to wash the floor mats, pre-rinse them with fresh water. This will help to remove debris that might be caked on, but loose enough for the high-pressure water to remove. The concept here is to gradually remove debris with each step – allowing the soap to clean the surface of the mats.
Step 5 – Wash with Soap and the Wash Mitt
Using tons of suds, wash your rubber floor mats with your wash mitt. The microfiber material with the noodle-like appearance is good for penetrating those small creases in rubber mats.
No need to get too aggressive with washing, as a good once-over should remove all dirt and stuck-on debris. When you’re done with the front, wash the back.
Step 6 – Rinse them Off
Using your handy-dandy garden hose, rinse off the floor mats completely. You don’t want any soap to stick to them, so plenty of water is best – on both sides.
Quick Tip: When you rinse the first side off, rinse the ground too so that all of the soap has been washed away, thus preventing the other side from getting soapy all over again.
Step 7 – Dry with Air or Hang
If you’re lucky enough to have an air compressor, attach the air chuck to the hose and blow them off. The key is to remove any standing water. This is especially important for those living in areas with heavy water – or water rich in calcium, to reduce water spots.
If you don’t have a compressor, shake them off and dry with a towel initially. Then let it air dry by hanging in a clean area.
Step 8 – Return to Car Once Fully Dry
Once the mats are completely dry on both sides, replace them to their location. It’s a good idea to vacuum the floorboard first and clean the area before replacing them.
How to Wash Cloth Car Floor Mats
The other common floor mat is the cloth type. Unlike plastic or rubber mats, they are not as easy to wash. In fact, it can be rather challenging – especially if they have stains or embedded debris in the mat. There are two ways to clean these types of mat:
- Vacuum the dirt and debris from the mat.
- Wash stains from them.
The first one is rather explanatory, but if you’d like to review the steps, here they are:
- Step 1 – Remove them from your vehicle
- Step 2 – Shake them off
- Step 3 – Vacuum the mat with a shop vac
- Step 4 – Vacuum the floor of your car
- Step 5 – Replace them in their location. Make sure not to place them in a way that can impede the brake, clutch, or throttle pedals.
Washing Cloth Car Mats
If the first method listed above is simply not enough, you might have to get a bit creative. There are several good products available for removing stains in cloth floor mats, and a simple Google search can help you with this.
However, if you’re up for an adventure and love DIY solutions, consider this concoction.
DIY Carpet Cleaner: To correctly blend this recipe, grab yourself a large mixing bowl for starters. Here is what you’ll need (ingredients)
- 3 tablespoons of grated soap (dish soap works well if you don’t have other stuff)
- 2 tablespoons of Borax
- 2 cups of boiling water (don’t burn yourself)
- 10 drops of your favorite essential oil (for aroma enhancement if you please)
Mix all these ingredients in a bowl, until they are fully blended. Once you’re done, let the mixture cool. Keep it in the bowl and use a stiff bristled brush to dip into the solution, then follow these directions. If you’re going to use a consumer-grade carpet cleaner, follow their directions for optimal results.
Once they have been vacuumed, continue with this method.
First – Dip the Brush in your Solution and Start to Work into the Stained Area
When you’ve got the brush filled with cleaning solution, place a few drops of the solution onto the surface and lightly brush on the stained area. You’ll want to rotate the brush in a circular pattern, continuing to add cleaning solution if needed for aggressively soiled areas.
Second – Continue Until the Stain is Visibly Removed
Sometimes you’ll have to continue with this method a few times until the stains have been removed. There are some stains that simply won’t be removed with the main cleaning agent. If this is the case, it’s a good idea to consult with a car detailer, to see if they can help you with the stain removal.
If you’ve removed the stain, use some fresh water to saturate the brush and complete the same process. This will remove any of the residual cleaner, and extra debris.
Third – Vacuum Once More
If you’ve got a wet/dry shop vac, vacuum the floor mats a final time. This will help to remove any powders or damaged fabrics from the stained area. When the mats are completely dry, place back in the vehicle.
Wrapping it Up
Clean car mats not only enhance the interior appearance of your car but can also help to reduce slippage of your feet while driving. Believe it or not, this has been the source of several car accidents in the past.
So, no matter how you choose to clean your floor mats, make sure you do frequently and always replace them as intended.


Comments (0)
There are no comments for this article. Be the first one to leave a message!