
Our world is going through a baffling health crisis our generation has never seen – COVID 19. While there are several arguments about the spread, how it impacts different people, and mitigation strategies, one thing is for certain – there is a renewed effort to improve cleanliness of a car. This includes finding the correct methods for disinfecting your car’s interior.
People across the globe are wearing face masks, gloves, and hand sanitizer like it’s going out of style. In fact, the over production of hand sanitizer is a leading reason why you can’t find Isopropyl Alcohol in stores – used in the final step of prepping for Armor Shield IX.
Since we still spend a large portion of our days inside our daily drivers, keeping it clean and free of harmful bacteria is more important than ever. So, let’s explore some of the best ways and techniques for disinfecting your car interior – correctly. We’ll also thrown in a few “less than successful techniques”.
Facts About COVID-19 Bacteria Spread on Surfaces
Several studies have been completed recently that indicate that the COVID-19 strain of coronavirus may continue to live on a surface from several hours to multiple days. That’s a lot of range – huh? The truth is that we simply don’t know the facts about COVID-19 yet.

According to the National Institutes of Health, the virus that causes COVID-19 is stable for up to 24 hours on cardboard and up to two to three days on plastic or stainless steel. Another study suggests that similar viruses can live on “inanimate surfaces like metal, glass or plastic for up to nine days.”
And while health studies and simple mathematics will confirm that less than 1% of the global population has tested positive for this virus, and less than 1/10th of 1% have experienced COVID-19 fatality, it’s still better to be proactive about our health – and that of all vehicle occupants.
What Should Be Disinfected Inside Your Car?
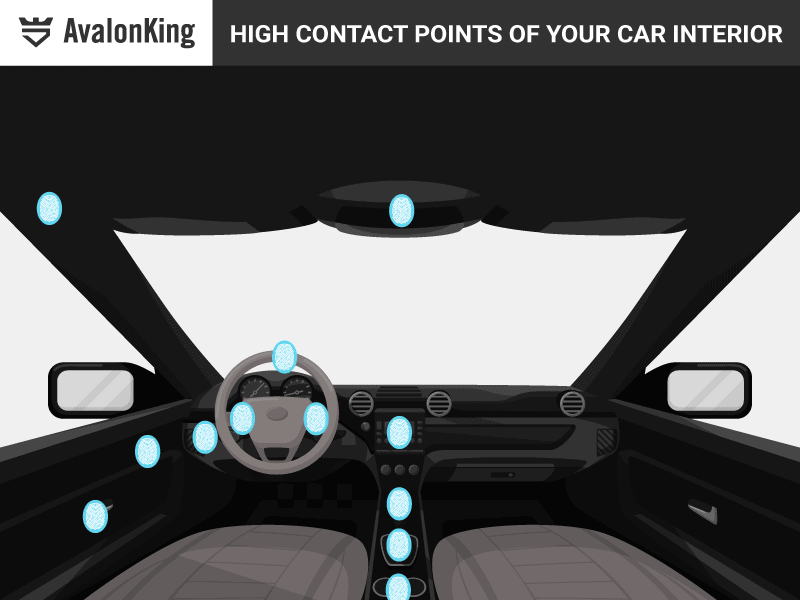
Like the old saying goes – “if you’re gonna do something, do it right.” If you’re thinking about disinfecting your car, there are multiple, individual components inside the cabin that you should focus on cleaning.
These surfaces can include:
- Door Handles (inside and out)
- Door Lock and Power Window Buttons
- Your Key Fob and Push Button Start
- Steering Wheel
- Touchscreen & Infotainment System
- Gear Shifter
- Buttons on Dash
- Seat Belts and Insert Housings
- Glove Compartment
- AC/Heating System Vents
- AC/Heating Controls
- Turn Signals
- Side Door Arm Rests / Center Console
- Rear Seat Doors, Seat Belts, Door Controls
Understanding the Difference Between Sanitizing and Disinfecting
Before we dive too deeply into the disinfecting strategy, it’s important to understand the difference between sanitizing a surface and disinfecting one. According to the United States CDC, sanitizing refers to lowering the number of germs on a surface to a safe level, “as judged by public health standards or requirements.”
This process works either through cleaning (which physically removes germs from surfaces) or disinfecting (which kills germs). Sanitizing is generally a less gentle than disinfecting.
While sanitizing refers to lowering the number of germs to a safe level by either cleaning or disinfecting, disinfecting itself refers to killing nearly 100 percent of germs on surfaces or objects, according to the CDC. This works by using chemicals to kill germs.
Disinfecting doesn’t necessarily clean dirty surfaces, but it does kill germs, helping to lower the risk of infection – or specifically the spread of COVID-19.
What’s the Best Way to Disinfect Your Ride?
So – if you’re serious about reducing the potential of spreading COVID-19, you’ll have to take some serious methods to disinfect your ride. However, it’s not as complex as you might think. It really breaks down to understanding the concept of cross-contamination.
Here is a brief explanation. Every time you touch an area that has not been disinfected, you’re picking up any remaining bacteria and germs and placing them on your hand or gloves. When you touch a freshly disinfected area with that cross-contaminated glove or hand, guess what – it becomes contaminated again.
So, to do this correctly, you need to be very meticulous and work in a pattern or “loop”. Here are a few best practices for disinfecting the interior of your car, truck, or SUV.
First – Wash Your Hands
Before you gather all supplies, wash your hands, and put on a pair of nitrile gloves. This will help reduce spreading germs from one supply to the other.
Second – Gather All Supplies and Place them Near Your Car
When you disinfect your ride, make sure to gather all supplies and organize them in an easy-to-locate and reach area. With regards to the type of disinfectant to use, there are a few products that you should be careful not using.
First, don’t use items with bleach or hydrogen peroxide – as this will likely damage plastics, vinyl and leather materials inside the cabin. Second, avoid ammonia-based cleaning products – especially when disinfecting your glass surfaces.
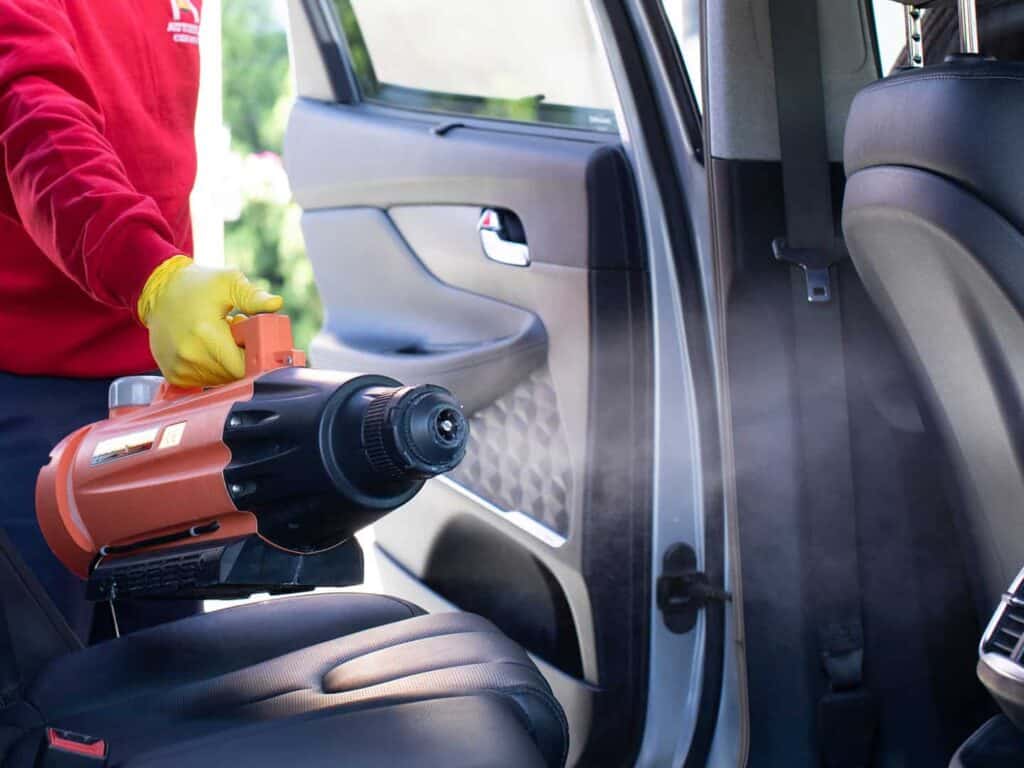
I prefer to use a Tub O Towels Heavy Duty disinfectant wipe for all car disinfection tasks – as it’s cheap, easy, and highly effective. If you’re looking to disinfect your AC/Heater vents, you’ll need a steam cleaner, and that’s at least a $200 investment.
If you’re really trying to up your disinfectant game, and want to reduce the potential of allowing germs to stick, try to find a good anti-microbial product – or even better, have a professional detailer or auto salon complete this process for you if you’re hesitant.
Third – Work in a Pattern
Whether you move from front to back, left to right, or any other direction, make sure to follow a pattern – which will allow you to disinfect as you go. This will help to reduce cross-contamination and improve your efficiency.
Fourth – Wash Hands Right Before You Start
If you’ve got your gloves on, wash them with soap and water before you start the project. Don’t touch anything expect your supplies and disinfect the areas with those materials only. It’s nearly impossible to avoid touching things during this task, just do your best to reduce it.
How to Disinfect Surfaces in Your Car
Ok, so now that you’ve got everything set up and organized, it’s time to disinfect your vehicle. The key here is to apply your antibacterial spray or disinfectant on a clean microfiber towel, use that towel to wipe the vehicle surface, then use a fresh and dry microfiber towel to dry.
But, before you disinfect, you’ve got to clean the interior of your car correctly. We’ve outlined the interior cleaning and detailing process in this blog, which I highly recommend reading for a recap. Once you’ve done cleaning, you’ll proceed to the disinfection process.
Step One – Start with Doors and Hard Surfaces
It’s always best to start with your larger, easy to wipe down areas like door panels, arm rests, dashboards, steering wheels, and center consoles that are made of harder surface materials. This is where you’ll use the disinfectant wipe. Here is a quick tutorial on how to accomplish this:
Clean the area first. You want to remove any dust and dirt off the surface before using the disinfectant wipe.
Wipe the surface with the wipe. It’ll leave a wet residue after using it, and this is ok.
Dry the surface with a clean and fresh microfiber towel. The important thing to remember is NOT using a used microfiber towel – or one that you’ve used on another vehicle.
Step Two – Disinfect Carpet and Seats
After your high-touch areas (including your key fob, the touchscreen, and other items you cleaned in step one), focus on disinfecting the carpets, seats, and other cloth materials. For this step, consider using a disinfectant spray (again that does not contain drying agents or too much Isopropyl Alcohol). Follow the directions listed on the product for optimal results.
Some detailers recommend agitating or using a brush to dig deep into the surface – for a superior disinfectant result. Honestly, this should be completed during the cleaning phase. With disinfecting, the key is to remove the bacterial through the chemical introduction.
Step Three – Finish with Glass and Exterior Handles
As you’re finishing the surfaces of your ride, the last items to disinfect is the glass including windows, windshield, and mirrors. There are some great products that clean windows and glass that do not contain ammonia components. For disinfecting, those are ones you’ll want to use.
You should also disinfect the exterior entry handles of your car. Now, it’s more than likely that they’ll be the first to become ‘contaminated’ with germs and bacteria, but you should complete this step regardless.
Finally – Replace your Indoor Cabin Filter
The last step of interior car disinfection is removing the indoor cabin filter. Consider this – every time you turn on the AC or heater, bacteria and germs will circulate through the vents, and through that filter. If you’ve spent some time disinfecting your interior, the last thing you want to do is turn on the AC and have all those old germs spread into those surfaces.
Consider a Professional Interior Detailer
If you’re somebody who lives with asthma, COPD, chronic allergies, or diabetes, it is probably a good idea to consult with a professional auto salon that can complete a full-service interior disinfection service.
This will include using steam cleaning or vapor-enhanced disinfectants that not only kill 99.9% of harmful bacteria and germs, but also can use an anti-microbial product that will continue to kill germs as they enter your vehicle. These products are only applied by professional auto salons, so make sure to find one you can trust that has a proven name and track record.
Wrapping it Up
As you begin to navigate the process of disinfecting your vehicle, just remember a few simple tips. First, always start by cleaning first (including vacuum and wiping all surfaces down to remove grime). Second, always use auto-specific disinfectant sprays or wipes, and dry with a completely clean microfiber towel.
Finally, don’t forget those key fobs, touchscreens, and other high-traffic touch sections of your car. It’s always a good idea to disinfect your car every three months, to maintain a healthy interior air quality environment.


Comments (0)
There are no comments for this article. Be the first one to leave a message!