
Walk around your average grocery store parking lot, and I’d wager that you’d find no less than 10% of all cars, trucks, and SUVs have fading car paint. Whether it’s due to excessive exposure to UV sunlight, or cheap, single-stage paint applied at the factory, vehicles today are more prone to having the exterior paint fade than in years past.
So how do we fix this growing problem?
Well, it all depends on the severity of the paint damage, the type of paint that has been applied, and several other factors. It also depends on the type of damage done.
For example, if the paint on your daily driver is peeling, you’re pretty much screwed. However, if it’s just lost a bit of luster and shine, that can be fairly easy to resolve with a rubbing compound like Meguiar products or other brands.
Let’s dive into addressing a few of the common sources of fading automotive paint, how to determine the extent of the damage, and a few tips on how to bring your vehicles shine back to life.
What Causes Car Paint to Fade?
Cars are just not made the same as they were in the good old days – but neither are people. Now, stop rolling your eyes and hear me out.
Back in the 1950s and ’60s, cars and trucks were manufactured with a focus on quality, and to hold up against being completely abused. But car owners were also more likely to spend time taking care of said daily drivers. It was commonplace to spend your Saturday’s washing, waxing and detailing the car.
The problem was those vehicle owners HAD to wax and protect their paint, to reduce the potential of faded paint.
Fast forward to 2019. Most consumer vehicles roll out of the factory floor with single-stage paint being applied – with a clear coat finish. In fact, it’s about a 95% ratio of new cars feature clear coats. While it’s paint is applied with 7 to 10 individual coats, heat-treated and inspected by CAT scan equipment for imperfections – the paint quality actually sucks.
This brings us back to understanding what actually causes the paint to fade.
Generally, there are four sources…
Direct Sunlight – or UV Rays
Spending time outdoors is relaxing, but stay too long under direct sunlight and what happens? Well, if you’re like me, that pain in the ass sunburn is the direct result.
Your car’s paint is exposed to harmful UV rays produced by the sun. While it might have a clear coat of protectant (like an SPF 15 sunblock) – ultraviolet rays are still potent – and can cause the paint to fade.

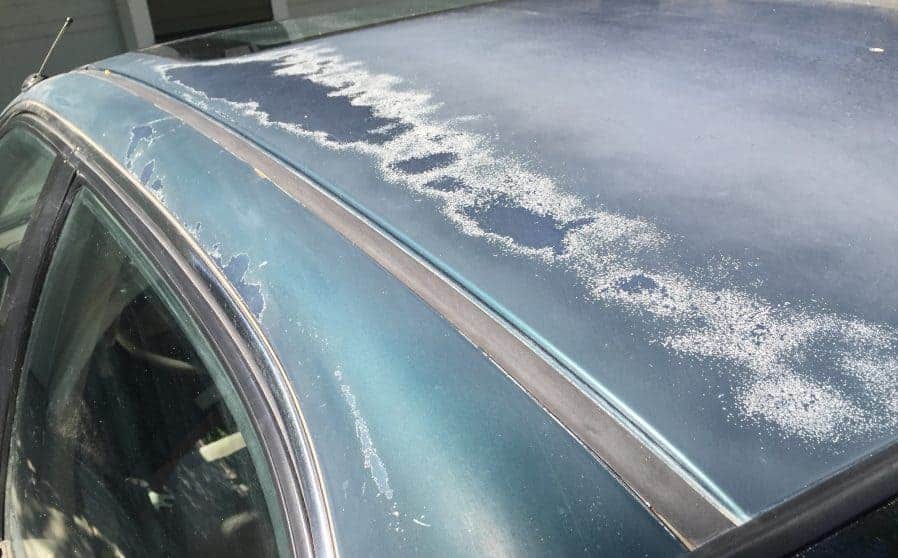
Most people assume that it’s the rays themselves that cause the fading. That’s not entirely accurate. It’s the heat that builds up on the surface that causes the paint to fade. The most common location of heat build-up is a flat surface, such as a hood or roof.
Corrosion

Have you ever noticed rust or chipping paint on cars located on the coast or near an ocean? Well, this is because salt and corrosion are literally eating the clear coat off the vehicle.
The primary problem occurs when salt or saltwater stays on the paint surface. When this happens, oxidation is the result.
In most cases, the oxidation will cause the paint to peel or chip easily. If this happens, paint restoration is only possible by removing the older paint and repainting the vehicle.
Abrasive Chemicals and Cleaners

If you’ve read our article on car detailing, you’ll remember how much we stressed using the right car detailing supplies. This begins with the soaps and cleaners used, follows with the right cleaning materials, and the correct supplies for drying.
We also talked about using the right methods for washing a vehicle (the two-bucket method), so that excessive debris does not cause scratching or damage to the clear coat.
To reduce the potential of paint fading, never use dishwashing soaps or other cleaning products with abrasive chemicals. It’s also important to use paint protection products that are not excessive with chemical agents. It’s also not a good idea to visit automatic car wash facilities too often.
Pollution and Contaminants
Yes – acid rain is real. But so is smog and other forms of pollution and contaminants. While you may not see it, smog and other contaminants in the air we breathe or touches your car can destroy the paint surface.
Items like bird crap and bug splatters contain a lot of acids, which can eat away at clear coats and paint.
Determining Your Fading Car Paint Repair Options

There are two types of paint jobs on cars, trucks, and SUVs sold today – a single-stage paint job and paint plus clear coating. If you have a low end or entry-level vehicle, it’s quite possible that you have the single-stage paint.
Most newer vehicles use urethane-based paints – lacquers and enamels are reserved for custom paint jobs nowadays.
So – if you’ve determined that the paint on your vehicle is faded, you’ll have to identify the type of paint or if a clear coat is on the surface. If you have a clear coat, there are some steps below that you can follow to improve the shine and depth of the paint. If you don’t have a clear coat – don’t waste your time – have the car repainted professionally or trade it in.
Here is how you can tell if you have a clear coat.
- Check the paint code attached to the VIN plate. You’ll notice on a vehicle ID tag that there are several numbers and letters. To find the paint code, look on the vehicle certification label or the service parts identification sticker.
- Ask the dealership. If you want to save time, just contact a dealership and ask the service department. They’ll ask for your VIN number and tell you if you have a clear coat – and the type of paint as well.
- Test it with paint thinner or sandpaper: For those who are adventurous – you can test a clear with one of two ways. First, put some paint thinner on a rag. Find a location on the vehicle that isn’t too noticeable. If you lightly wipe the paint thinner soaked rag on the paint, and you see the color of your paint – the clear coat is non-existent. You can also use 600 grit sandpaper and lightly sand a section. If the debris is clear, you have a clear coat. If it’s colored – well, you know.
Steps for Fixing Car Paint that is Faded
Once you’ve determined if your car has a good clear coat, you can complete a paint restoration process. Now, there are two schools of thought when it comes to fixing faded car paint.
DIY Small Section Repair

Most of the time, there are small pockets of faded paint on your car. It’s common for roofs and hoods to be the primary location of faded paint. Some DIY experts will only repair faded paint in the sections that have damage. And that’s all good for some people.
DIY Complete Car Paint Restoration
If one section of your paint is faded, the rest is bound to follow sooner than later. So, instead of just putting a minor repair, why not do it the right way – by completing a full car paint restoration. We’ve got an awesome article on how to complete a DIY car paint restoration – so give it a read for step-by-step instructions.
If you’re hell bound on doing the quick fix – here are some steps on how to repair small sections of faded paint.
Step 1 – Gather the Supplies for Fixing Faded Car Paint
To fix faded car paint correctly, you’ll need the following supplies:
- Car Washing Materials
- Car Buffing Compound
- An Electric Machine Buffer
- Several Microfiber Buffing Pads & Polishing Pads
- A Bucket of Water
- A Paint Protection Product (car wax, car polish, paint sealant or Nano-ceramic coating) – carnauba wax along with some elbow grease is the best option for small sections. For the entire car, opt for a ceramic coating.
Step 2 – Wash the Car

Once you’ve gathered the supplies, you’ll want to completely wash the areas you are going to attempt to fix.
Always use the two-bucket method for washing – as it will improve your chances of success in fixing faded paint.
Step 3 – Remove all Debris with a Clay Bar

After washing, you’ll want to completely remove contaminants from the paint surface. To accomplish this, use a high-quality clay bar. This video will explain how this process is completed.
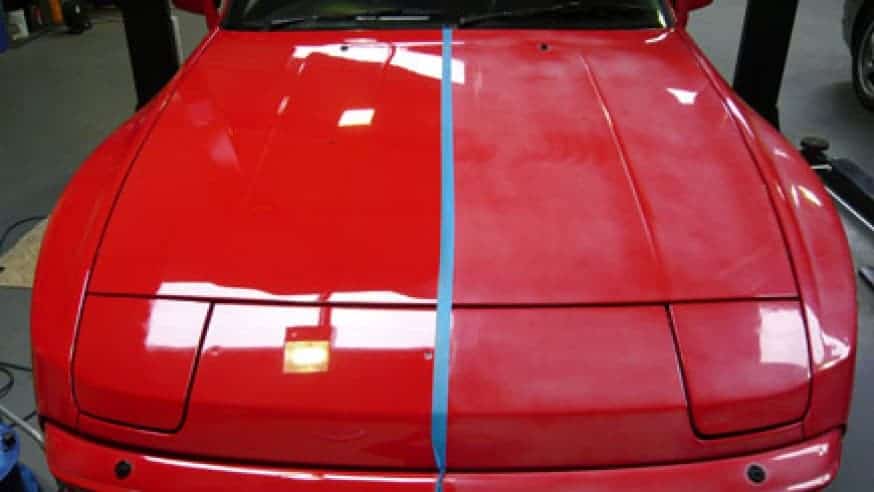
Step 4 – Begin the Buffing Compound
This quick video is actually quite accurate on how to complete the buffing process of restoring faded paint to a better condition. Follow these general steps:
- Wet your buffing pad with clean water
- Apply buffing compound to the soaked pad and the faded paint area
- Begin to buff the impacted area
- Complete this process a minimum of three times
- Inspect the faded paint surface by cleaning it with fresh water
- Once the paint appears ‘fixed’, apply one final buffing with compound
Step 5 – Apply Car Wax, Paint Sealant, or a Ceramic Coating

Now that you’ve fixed the damaged paint, you’ll want to protect it. Car owners basically have three options here:
Car Wax
You can apply car wax on the treated area, which will leave a small layer of protection that will require monthly service in order to protect.
Paint Sealant
A second option is to use a paint sealant product. This is applied in a similar fashion as car wax and polish but will last up to six months in most cases.
Ceramic Coating
If you intend on keeping your vehicle for more than two years and would like to apply a single product that can last for this time, consider a DIY nano-ceramic coating like Armor Shield IX (read our Ultimate guide to ceramic coating for cars). If you’re going to apply a ceramic coating like Armor Shield IX, it’s best to do so on the entire car – not just a small section.
Why a Ceramic Coating is the Best Paint Protection Option for Faded Paint
If you’ve fixed the faded paint correctly, it’s likely that you’ve removed a little of the clear coat at the same time. This will leave the paint surface exposed to the elements more than before. Applying a product like Armor Shield IX on the recently repaired faded paint, you’re actually providing an incredibly hard layer of protection.
A nano-ceramic coating like Armor Shield IX leaves a microscopic layer of protection that has exceptional hydrophobic properties, is highly heat resistant, and is harder than any other paint protection product. It also helps to enhance the shine and luster of paint and reduces the time required for washing the vehicle.


Comments (4)
My car looks old and like it came out from a scrapyard, so I want to invest in its renovation. I really liked what you mentioned about consulting with a professional auto shop when it comes to fixing your car’s faint paint, so I’ll be sure to look for one next week. I appreciate your advice on fixing my car’s paint with a specialist’s help.
Your article “The Definitive Guide to Repairing Faded Car Paint” is very helpful for me. After reading your article I got a lot of knowledge from your article. I have some knowledge about but after reading your article I think; I have to gain more knowledge about this topic. Thanks!
Hi I just bought a 1974 Lotus Europa that has been sitting in a barn for 40: years and I am looking at bringing it back to life and am going to clean and buff it as much as possible so that I can get back to the original colour. I never thought about the clay part but do this twice a year on my Audi and it looks spectacular and a nice soft feel to it. So hopefully I can do something similar with the Lotus and enjoy the car without having to repaint it seeing as how it is 100% original right now and have every intention of keeping it that way
Thanks for the tips
I have a 7 year old Honda that about 4 weeks ago I notice the paint looking patchy on the roof. This is my 3rd Honda and there paint is the worst. This normally happens about 10 years into these car, but my 7 year old Honda is looking patchy on the roof.