
I just got back from a 7-day cruise to the Western Caribbean – which didn’t suck. In my trip down south, I noticed a boat-load of mid-2000’s Nissans and VW’s that were two-tone paint and faded clear coat. While the use of car waxes, paint sealants, and even ceramic coatings are not as common in countries like Belize, Honduras or the Yucatan Peninsula, sun damage is quite apparent.
Some argue that this is mainly due to the sea-rich air, and they’d be correct. But, countries closer to the equator are aggressively exposed to damaging ultra-violet sun rays. The combination of salt air & water, along with constant UV ray exposure, is a Mecca for clear coat damage – that can harm headlights, plastic trim, and other automotive components.
Paint damage from sunlight is a constant threat, regardless of where you live. So – how can you improve the potential of protecting your car’s paint from sun damage? Or better yet – is it possible to prevent sun damage on a car’s paint?
To be honest, unless you’re a vampire – it’s virtually impossible to prevent sunlight damage – unless you are proactive about protection and reduced exposure. That’s what we’ll explore today. In today’s blog, we’ll focus on offering some tips for keeping your car (and its parts) as protected as possible from exposure from UV rays caused by life-giving sunlight.
How is Car Paint Damaged by the Sun?
I’m pretty fly for a white guy. But that pasty white skin does come with enhanced possibility for being burned during outdoor activity. On our cruise last week, I brought (7) cans of SPF 50 sunblock spray, to protect said pasty white skin from being burned. And it worked.
The sunblock worked as a protective layer that blocked UV light from penetrating my skin, leading to burns. Without the sunblock, the skin would burn in an hour or so. Sun rays have the same damaging effects on your car’s paint.
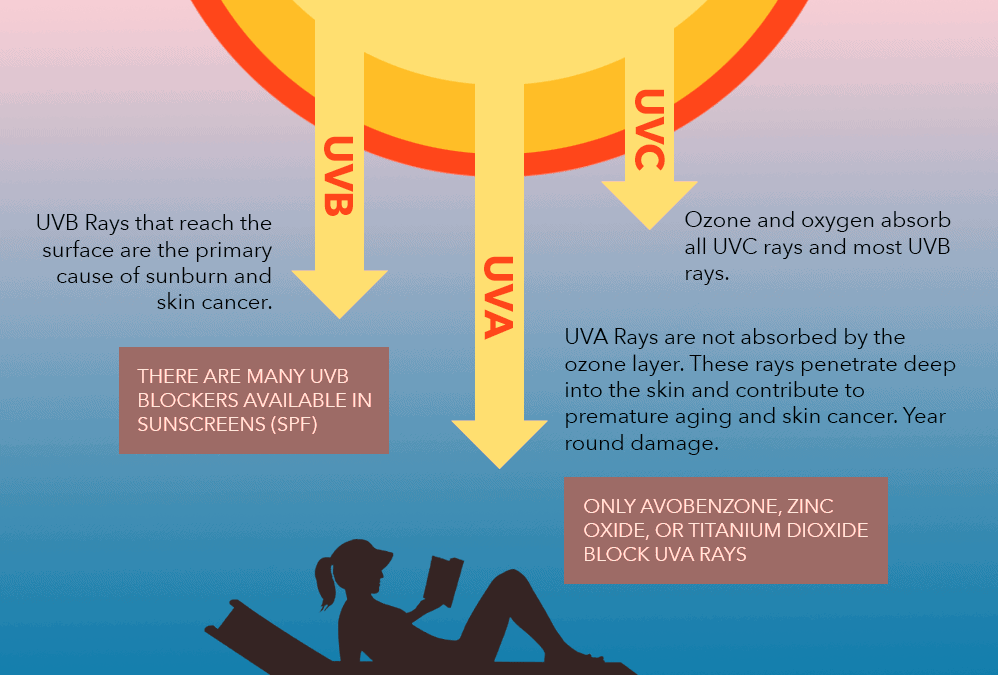
UV light is invisible and powerful. UV rays emit an electromagnetic spectrum wavelength that can be as small as 10 nanometers to as large as 400 nanometers. That’s basically a span of light smaller than visible light and longer than x-ray emissions.
What’s amazing is that the UV light that hits our skin and cars paint is less than 10 percent of the electromagnetic radiation that is produced by the sun.
This is the root source of paint damage. The UV radiation is a potent energy producer that stimulates a surface to react when it’s hit by the sun rays. It produces a quick burst of energy, which is given off as heat but also results in molecular bonds that break.
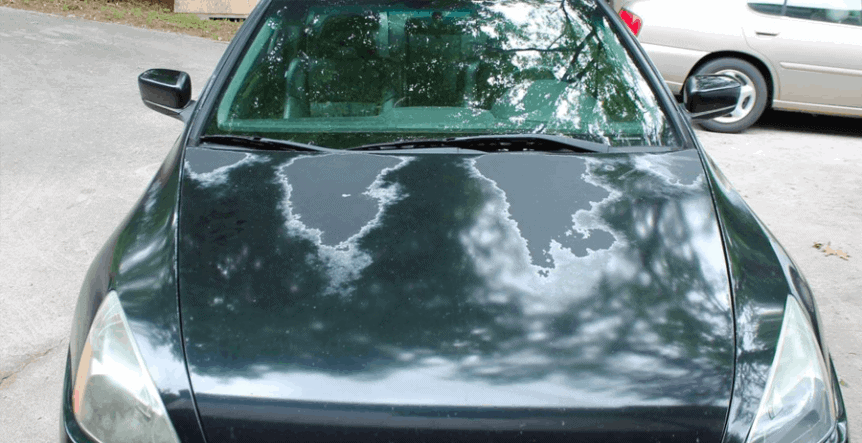
While the damage is not immediate, over time, it can start to breakdown molecules in car paint, clear coat, and other materials such as headlights, plastic trim, and more. When these molecules are broken, the luster of color is reduced, which produces the dulling appearance. Eventually, the molecular breakdown will cause ‘holes’ in the layers, which can lead to oxidation and corrosion, the root source of rust.
Are some Colors Easier to Fade by Sun Rays?

Each color in the spectrum has a specific wavelength that allows our eyes to see it. In fact, automotive paint is engineered to absorb those wavelengths inside the visual spectrum, except for the individual wavelength associated with that specific color. So basically, the colors we see are everything except for the color we see…if that makes any sense.
One of the colors that are more susceptible to fading is red. This is because red has the lowest energy wavelength of visible light. This causes it to appear faded quicker because the UV rays penetrate the molecules in “red” at an aggressive rate. This same situation happens with other shades of red, which include orange, purple, or yellow.
The two colors that tend to stand up longer to UV rays is black and white. This is due to the reverse factors, where the wavelength of energy is higher than ‘bright’ colors. However, just because certain colors ‘bleed’ quicker than others, doesn’t mean you should be less protective of your car’s exterior parts.
Is Paint Fading Only Caused by UV Rays?
Although UV light is the main source of paint degradation and fading, there are other environmental factors or physical attributes that can lead or expedite to advance paint damage.
Bug Splatters and Bird Droppings

Animal waste, such as bug guts and bird shit are highly acidic. When you hit that bug in the middle to the night, or that bird strategically targets your ride, the byproduct will slowly begin to eat away whatever it touches. Bird crap has high levels of uric acid, which can cause damage within a few hours if combined with UV rays.
Road Grime and Salt

NaCl or sodium chloride is great for making food taste better – but it causes havoc on automotive paint and bare metal. Salt is another contaminant that opens the door for UV light damage to occur in the automotive component.
It can penetrate a protective surface, whether it’s automotive wax, clear coating, or even some automotive paint sealant products. Road grime is a combination of chemical toxins like tar, gravel, and oils that can penetrate surface areas to lead to damage.
Not Keeping the Car Clean
Even mild dirt and dust can start to cause damage to car paint surfaces. Over time these contaminants reduce the layer of protection that a clear coat provides. This accelerates the process of UV light penetration, starts to break down those paint molecules, and thus leads to fading or damage.
How Can You Protect Your Car from UV Rays?
Here are a few tips on how to wash your car correctly, to remove most surface contamination that leads to aggressive UV radiation damage to paint and other automotive parts.
Wash the Car Every Two Weeks – Correctly

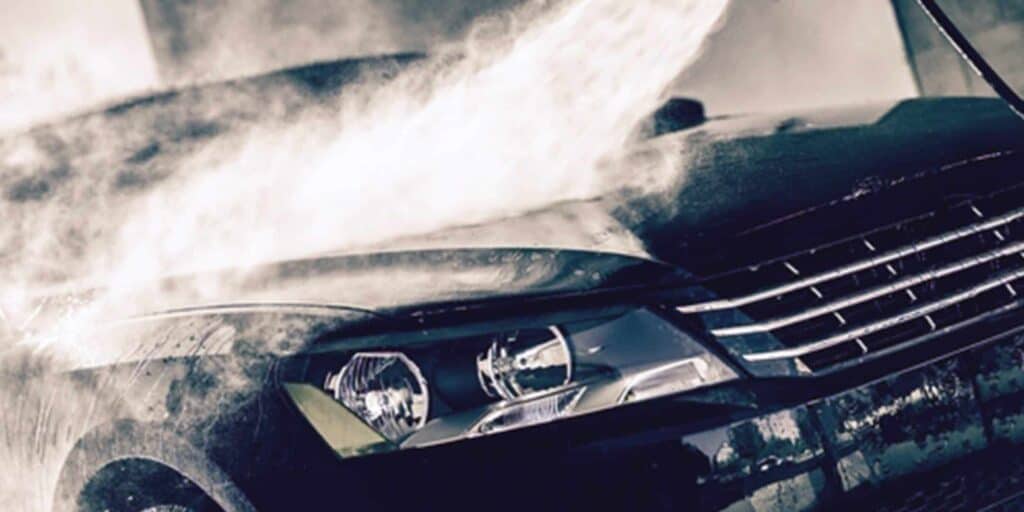
Believe it or not, there are bad ways of washing your car. Driving to the automated car wash, using dish soap and detergents, or your dad’s old t-shirt can cause more damage to the paint and clear coat of your daily driver.
The two-bucket washing technique is the best way to correctly wash your vehicle.
It involves the use of two specific car soap and clean water buckets. The basic premise is to use one bucket for applying the soapy water, and another to rinse the wash mitt after each section. This removes debris that is trapped in the wash mitt, so you don’t spread more dirt on your vehicle.
This video will explain how to best complete the two-bucket car washing method and tell you what supplies you should pick-up. While you can get these at your local auto parts store, you can save a lot of money by purchasing through Amazon.com.
So – here are the basic steps for washing your car correctly – which is the first step for protecting paint and other car parts from excessive damage due to UV rays.
Step 1 – Prewashing the Car

After you have all your supplies, you’ll want to begin by washing your wheels and tires first. This ensures that all brake dust and road grime is removed on the wheels. Second, if there is debris from the wheels and tires on the car, you can wash it off, and not dry it – which will cause scratching. Make sure to use a unique bucket and wash mitt just for wheels. Brake dust has metallic components in it, so use common sense on this one.
The prewash is basically spraying water or using a foam cannon to remove loose debris from the paint. This also lubricates the surface area, for better washing and reduced scratching.
Step 2 – Washing
When it comes to washing, make sure to wash in sections like the hood, side panels, doors, and such. Complete the entire process before moving onto another.
Also, wash from top to bottom. This allows dirt and debris to flow downhill, which can reduce scratching and cross-contamination.
Step 3: Drying

Use clean microfiber towels to dry the vehicle. You can also use chamois to remove surface water, but make sure to use a debris-free microfiber cloth for the final drying step. Always go side-to-side, and do NOT dry in a circular motion. If you really want to be protective, use a leaf blower to air dry the vehicle, just don’t use an air compressor hose, as airlines have oil.
Skip the Wax and Sealants – Go Directly to Ceramic Coatings

Car wax and paint sealants are pretty good for blocking UV rays, but they wear out quickly. Plus, if your car is a daily driver kept outside, it’ll progressively wear thin. If you’re looking for longevity, the best and most affordable option is a DIY ceramic coating – like Armor Shield IX.
A DIY ceramic coating uses nanotechnology to fill microscopic peaks and valleys found on porous materials like clear coats, glass, plastic trim, or bare metals. When it cures, it provides a semi-permanent and quite durable layer of protection that blocks UV rays from penetrating to the clear coat. It’s completely transparent, so it amplifies the natural color brilliance of your automotive paint.
Ceramic coatings deflect UV rays, prohibiting them from penetrating the paint molecules and thus reducing the potential of molecular breakdown, oxidation, and the other contributing factors that lead to paint damage.
When applied correctly, and after completing some paint correction or prep work, a DIY ceramic coating like Armor Shield IX can protect the surfaces from 2 to 5 years.
Wrapping it Up
I really had a great time on my cruise – mainly because I was proactive about protecting my skin from being burned. The same concept applies to protecting your car’s paint surface. By begin proactive with your car washing (every two weeks is good), using a protective ceramic coating, and maintaining it as directed.
You can also reduce paint damage by UV rays by parking in shady areas or the garage more often or using a car cover. But, to be blunt, simply washing your car as recommended plus using a paint protection product of some sort is really the best way of keeping sunlight from damaging the car.


Comments (1)
Auto shops want from $1500 to $2000 to apply ceramic coating.
But then they want to "boost’’ it every year for $300.
Would it be pragmatic to allow them to do the original application, then DIY after that?
The yearly boost bothers me more than the original cost.
Thanks.
Gary