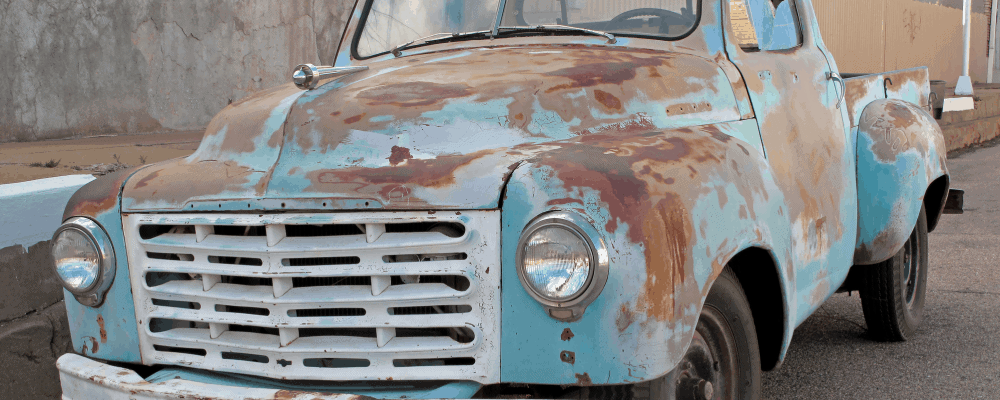
Rust sucks. It’s damaging, looks like crap, and just plain destroys metallic materials. Now, unless you’re into the whole “patina” Rat Rod culture (which I admit is bitchin) – rust is simply something you want to avoid like the … OK, I’m not going there.
We’ve touched on this subject before in our AvalonKing blog. But, many of you have written in asking for us to provide a detailed, step by step process for removing rust from your car. So, I’m gonna go old-school here.
No, I’m not going to include using Bondo – or stuffing the rust holes with newspaper and applying fiberglass (you old-school dudes are laughing right now). We’re gonna provide a 7-step process that works very well on modern metallic materials, like suspension parts, body panels, and the like.
So – let’s get cracking.
What Causes Rust to Develop on Cars?

If you remember your high school chemistry lessons, rust is also known as Iron Oxide. Its chemical formula is Fe2O3 – or two parts Iron and three-parts Oxygen. There are three items required to create corrosion, or the process of developing rust – a cathode, electrolyte, and an anode.
The process starts when an electrolyte sends fuel to an anode. At this point, oxygen is introduced to the metal and releases the electrical bond of electrons to move through the cathode. Accelerate this process by a few thousand times, and BAM – you’ve got rust.
What Role Does Water Play in Developing Rust?

Water itself does not create rust. It requires willing participants – typically bare metal (mainly iron) and an accelerator – oxygen. When water and other electrolytes (such as salt) blend, it creates a very weak acid that will slowly dissolve the metal – and then separates into two separate elements, hydrogen and oxygen.
However, if water is not present (in liquid form), other sources such as humidity or water percentages found in oxygen, can combine with other electrolytes (salt) to accelerate the rust process.
There ya go – your rust producing chemistry lesson of the day.
How to Remove Rust from Vehicle Surfaces

So, now that the learning is finished, let’s get to the heart of the matter – how to remove that stubborn rust from your vehicle. However, before you bust out that grinder, it’s first important to identify the rust, and determine if you’re able to remove it – or should just shit-can the project all together.
With rust, there is basically two forms:
Surface Rust or Minor Rust Repair: The surface rust is that brownish substance that is found on the top layer of metallic items. It’s basically at the opening stages of rust contamination and can usually be removed with sandpaper or an electric or pneumatic grinder.
Contaminated or Damaged Materials / Major Rust Repair: If the rust is present across an entire section or entire part (such as a body panel), major rust repair is required. This will involve using professional-grade grinder and perhaps some ‘filler’ materials (such as Bondo or Fiberglass). We’ll touch on this process below, but you should always defer to a professional autobody expert if it’s serious.
If the body panel or metallic item is damaged to the point where it has holes in the surface, it is best to replace that section entirely. While this can be repaired, it usually involves welding and advanced body repairing techniques.
And that’s just not the topic we’re addressing today.
Tips for Removing Surface Rust

Let’s begin with what you’ll need to remove surface rust from your vehicle parts.
- Rust Removal Spray
- Scoring Pad (3M makes a good one)
- Stainless Steel Brush
- Sandpaper – 320 grit is a good starting point
- Sanding Disc (for more aggressive rust levels)
- Masking Tape
- Gloves
- Dust Mask
- Eye Protection
You’ll start by collecting these supplies. At this point, we’re not going to address how to apply paint or recoat the rust-removed surface. One item you should do immediately is applying a primer – preferably a rust-prohibiting primer for the surface you are removing the rust.
Here is the step-by-step guide you’ve been waiting for.
Step 1 – Wash the Entire Area with Automotive Soap
Before anything else, wash the surface area where the rust exists. This will help to remove any oils, dirt, or other contaminants. Dry the area completely before moving forward.
Step 2 – Mask off the Work Area
One thing about rust is that it spreads like bacteria. If it’s located on one portion of your body panels, chassis, suspension parts, or frame, keep it contained to that area by masking off the other areas of the metal. This will focus the rust removal on that section.
Step 3 – Apply a Rust Removal Spray
There are a lot of good rust removal sprays on the market. And to be honest, they’re all virtually the same product. It doesn’t really matter which brand you select, just make sure to follow their specific directions for removing rust and using the product correctly. This is the most important item to remember here.
Step 4 – Remove any Remaining Rust with Sandpaper
If you’ve followed the directions correctly, most of the surface rust will be removed. However, if you used the spray product, and rust remains, you’ll have to proceed with some elbow grease and sandpaper.
I prefer to start with a 320-grit sandpaper, as it’s not too course or fine. The key is to start slow and use straight strokes in the same direction. This will minimize scratching and focus on the removal of rust.
As you progress through the sanding, stop periodically and clean the surface to inspect the area. Isopropyl alcohol works well – as it won’t cause rusting and dries quickly.
Step 5 – Wash with a Degreasing Agent or Soap
When you’ve finished removing the rust, you need to clean the area completely. I like using a degreasing or wax-stripping shampoo or automotive soap. This removes any residual rust ‘powder’, grease, or other contaminants. Rinse and dry when you’re finished.
Step 6 – Wipe Down with IPA Solution
This was a product I didn’t include in the list – simply because it’s optional. Some people will use a tack rag, which is a pre-paint applicator that is intended to remove dust or surface contaminants. With surface rust removal, I’d suggest a 30/70 dilution of Isopropyl Alcohol with distilled water, respectively. Spray it on the area and wipe with a clean microfiber towel.
Step 7 – Spray a Primer Over the Entire Area
If you’ve used sandpaper and the rust is in an area that is covered with paint, you should sand the color layer completely off, and spray a primer over the entire section. This will ensure an even coating of primer, so you can correctly paint the area.
If it’s bare metal, use a metal clear coat over that area.
Timmah’s Tip: Before you use any spray product, like the one for removing rust or primer, “practice” first on a piece of cardboard. This will allow you to learn how the can ‘sprays’, so you can apply it with reduced dripping or overspray.
Tips for Major Rust Removal

So, you’ve completed your initial inspection and found a ton of rust on your rear quarter panel, undercarriage, or bumper. Obviously, simply spraying an aggressive form of Coca-Cola on the rust isn’t gonna cut it.
This method requires some experience, elbow grease, and some power tools to do the job right. Let’s get on it.
For this method, you’ll need to add a power sander or grinding wheel, and some progressive levels of cutting pads.
Step 1 – Follow Steps One and Two Above
Wash and dry the area and mask off the area as we explained above.
Step 2 – Use a Grinder or Power Sander to SLOWLY Remove Rust
This is where some experience with body repair comes in handy. If you’re new to removing rust with a power sander or grinder, please research some videos to learn how this is completed. It really is a matter of touch, so you might want to test your talents on some spare metal. This video is one of the better ones out there.
For this step, you need to ensure you’re wearing gloves and eye protection before touching the grinder to any metal. SLOWLY begin to grind the rust, moving from left to right. Don’t try to remove all the rust at one point. The key here is to progressively remove it by going back and forward. This will keep the surface as level as possible.
Step 3 – Clean the Area with Degreasing Soap
Follow the step above that mentions this step once all rust has been removed.
Step 4 – Use a Fiberglass-Reinforced Body or Metal Filler
Back in the old days, we used a product called Bondo – which was a polymer-based putty used for filling in holes where rust previously lived. Today there are much better products – but the concept is the same.
You’ll prepare the putty, apply it with a putty knife of flat blade, spread it even across the entire section, and let it cure.
Follow the exact steps as recommended by your manufacturer of the putty for optimal results. Let it dry completely – which might take a day based on the product you use.
Step 5 – Sand the Body / Metal Filler
With this step, you’ll again follow the instructions from the body filler. Most of them recommend using a fine grit sandpaper, above 500 to start. As you sand away the excess, you’ll step up to finer grit sandpaper, eventually finishing around 1,500 grit.
Many of the same body filler products sell a scratch sealer, which you can apply after this step, then wet sand the finished product for a scratch-free surface.
Step 6 – Prime and Paint
Again – we’ll leave this step to you – as each surface type is unique and requires different types of paint or primers.
Wrapping it Up

Removing rust from metal on a car, truck, SUV, motorcycle or other project vehicle is not a cut and dry, black and white process. Depending on the level of rust, the condition of the metal, and even potential for rust developing again, you’ll have multiple options at your disposal to complete the task.
The main thing to remember is to take your time with this sort of project. And when in doubt – toss it out. Items like frames, chassis components and other vital safety pieces should always be replaced – not repaired.


2 comments
BARRY
WHAT PRODUCT CAN I USE ON A CAR TO REMOVE STAINS FROM WELL WATER IE SPRINKLER SYSTEM?
WHAT PRODUCT CAN I USE ON A CAR TO REMOVE STAINS FROM WELL WATER IE SPRINKLER SYSTEM?
Roland
Quick question. I helped a friend put new floor pans in his 57 Chevy. We both developed health problems (we’re in our seventies) before getting down primer. Now there is a thin coat of surface rust. What’s the best way to remove the rust before primer?
Thanks. Roland
Quick question. I helped a friend put new floor pans in his 57 Chevy. We both developed health problems (we’re in our seventies) before getting down primer. Now there is a thin coat of surface rust. What’s the best way to remove the rust before primer?
Thanks. Roland