
Improperly applying a high quality ceramic coating is like having a Ferrari and only driving it in reverse. You may be getting somewhere, but it’s pretty obvious that you’re doing it wrong, and everyone around you knows it.
Like most DIY projects, there is a staircase of necessary steps that one must climb when applying a high-end ceramic coating like Armor Shield IX. Those who want the best possible results adhere to the rules, while those who diverge from the path run the risk of having a finished product that looks like crap.
There are no shortcuts in the world of ceramic coating, especially when protecting something as important as a car’s paint. Take your time and you’ll be rewarded with unrivaled protection and stellar shine. Ignore our advice, and you’ll find yourself stripping the entire vehicle down because your rushed ceramic coating job turned out looking like Michael Jackson after nose job #7.
To date, AvalonKing’s Armor Shield IX DIY ceramic coating kit has a failure rate that hovers in the 1 in every 100 applications. Any guess as to what caused that measly 1% to materialize? Ignore the directions, or try to expedite the process, and disaster ensues. It’s really that simple. These costly mistakes can be avoided if people just follow the advice in this article, and keep an eye out for any of the quality control issues listed below.
Most Common Ceramic Coating Mistakes

Photo Credit: Devin Niemela/YouTube
AvalonKing didn’t cut any corners when it engineered Armor Shield IX. In order to make the world’s best DIY ceramic coating, we had to expend an extensive amount of time, money, energy, creativity, and patience. All car owners have to do is follow some simple application advice and avoid the following ceramic coating mistakes:
- Trying to coat a car when the air temperature is below 40° Fahrenheit, or about 4.4° Celsius will be problematic because it will cause the curing process to slow to a crawl. If prolonged for too long, the ceramic coating will be rendered useless.
- Coating a car in an environment with high humidity is another common mistake, as airborne condensation will slow the curing process, which often results in an oily-looking finish.
- Excessive coating is also fairly commonplace, which also results in a greasy looking coating that refuses to cure properly.
- Premature exposure to moisture will wreck a ceramic coating faster than you can say “smells like rain.” Precipitation, dew, mist, or testing the hydrophobic properties of the coating before it has fully cured can all compromise the quality of a vehicle’s ceramic coating.
- Skipping crucial prep-work steps or trying to take shortcuts prior to applying a layer of ceramic coating will cause all manner of malady to manifest. This is basic car maintenance advice at its very core, so clean thoroughly, and don’t assume that shortcuts will yield positive results.
- Not following the law of stacking, which requires the application of the longest lasting product first is fairly common as well. Remember, you can always wax over ceramic coatings, but you can’t spread a coat of Armor Shield IX on top of a layer of car wax and expect it to work.
- Applying ceramic coating in direct sunlight will also wreck all of that elbow grease. Always allow that initial 4-5 hours of hardening time to take place under the cover of shade or indoors before moving the vehicle out into the sun.
- Throwing a coat of ceramic coating on a hot surface is also a big no-no. Yet somehow, eager individuals still attempt to apply this product prematurely, often right after driving the vehicle or when it has been sitting in the hot sun.
- Although it will take up to two weeks for Armor Shield IX to fully cure, only 48 hours are required prior to taking the vehicle for a spin. But that’s the absolute bare minimum. Cut that cure time and go for a cruise while your ceramic coating is still settling, and you’ll be one unhappy customer upon your return home.
The trick to avoiding these common mistakes is simple: DON’T DO THEM. Simply follow the super-easy, brilliantly illustrated directions found within each box of AvalonKing Armor Shield IX, and remember that if you ever get stumped all you’ve got to do is contact us via our helpline.
Consequences of Incorrectly Applying Ceramic Coating on a Vehicle
A vehicle with a properly applied coat of Armor Shield IX is ready for almost anything Mother Nature throws at it. From hard winter storms and road salt, to acid rain and desert paint protection, this stuff repels it with ease. However, incorrectly applying a ceramic coating can lead to issues like high spots, streaking, an oily-looking finish, gritty textures, and poor coverage.
On the bright side, there is nothing within a nano ceramic coating that can damage a car’s paint, and if you look at the history of ceramic coatings, cases of paint damage are pretty much nonexistent. To date AvalonKing has yet to encounter a scenario to challenge this statement, so don’t buy into the ceramic coating myths about how it will wreck your ride’s paintwork or glass, because that’s completely untrue.
Regarding the issue of streaking, direct sunlight and too much alcohol tend to be the two most common causes, so go easy on the day drinking, alright guys? In all seriousness though, leaving too much Isopropyl Alcohol (IPA) on a surface after a wipe-down or not using the right mixture ratio will cause some pretty intense streaking. So watch out all you IPA lovers, because last time we checked streaking was a punishable crime in certain states.
On a more serious note, if you take the right supplies and use them in a controlled environment, you’ll be rewarded with a ceramic coating that will last for years. Mess around and ignore our warnings, and your vehicle will be stricken with maladies and piss-poor paint protection. It’s really all or nothing with this stuff folks, so if you’re not all-in you should probably go back to using that weak-ass wax.
The Importance of Prep Work Prior to Applying a Layer of Ceramic Coating
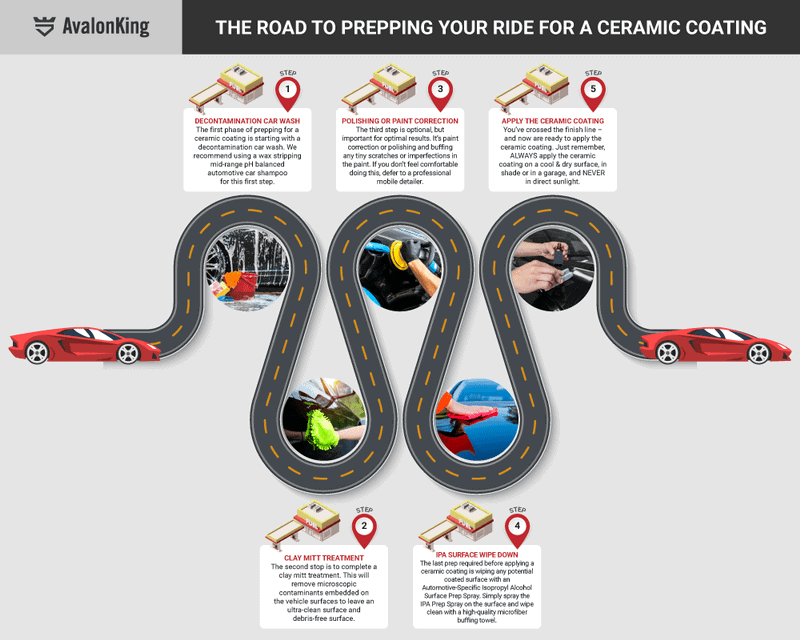
Prior to applying a coat of Armor Shield IX, or any ceramic coat product for that matter, a thorough round of prep work must first be conducted. In order for the nano-technology encapsulated within each bottle of Armor Shield IX to work well, it must come into close proximity to the clear coat/paintwork. This allows all of the microscopic molecules suspended within the liquid to embed in the invisible ridges and pours sprawled across the surface of the vehicle, which once cured creates an extremely slick, glass-like paint surface. Being that this is arguably one of the greatest perks of using ceramic coating products, proper prep work remains crucial to achieving a successful application.
We’re not just talking about removing bug guts, tar, bird turds, grit, grime, and anything else that’s embedded in your car’s clear coat. The removal of waxes, glazes, sealants, and/or old protective coating products must be done prior to application as well, so it’s going to take a bit of elbow grease on your end if you want stellar results.
So what are the mandatory prep work steps that must be completed prior to applying a layer of DIY ceramic coating?
- Wash and Dry- Use a 2-bucket system with microfiber products and a highly reviewed car shampoo to dislodge any surface skuzz, and always work from the top down in order to avoid cross-contamination. Then, crack open a fresh bag of fluffy microfiber towels and dry that ride as quickly as possible to avoid unsightly water spots from forming.
- Clay Bar- Hitting a freshly washed and dried exterior with a clay bar will lift any stubborn impurities that might be lurking within the clear coat. The best results often depend upon this additional step.
- Polish and Paint Correction- Now it’s time for a full buffing in order to add a layer of shine to the car’s clear coat and plastics, while kicking-off any airborne debris that might be lingering on the surface. After that it may be off to the body shop for some paint correction. This is a pricey, yet necessary step on vehicles that are driven regularly, as they are the most prone to unsightly damage like surface scratches, scuffs, and clear coat oxidation.
- Apply IPA- Wiping all surfaces that are destined to receive a layer of ceramic coating with a properly blended Isopropyl Alcohol (IPA) spray will help guarantee that the surface is devoid of contaminants or residual oils left behind from the prior preparation steps. Once diluted, an IPA solution will allow the ceramic nano coating to grasp onto the car’s paintwork without damaging the clear coat or any exposed plastic surfaces nearby.
While this new wave of DIY enthusiasm is certainly exciting to see, there’s a lot of room for error within this market as well. Fortunately, the consequences of not adequately completing the required prep work (or skipping it entirely) before applying a DIY coating is never detrimental to the well-being of the vehicle.
The worst case scenario is that a can of polishing compound must be purchased in order to remove the ceramic coating prior to starting the entire process over once more. Since the cost of ceramic coatings has reduced significantly in recent years, this isn’t as big of an issue as it might seem, especially when affordable products like Armor Shield IX pack industry leading 9H ceramic coating hardness ratings for under $70.
Quick Tip: Armor Shield IX plays well with paint protection film (PPF), clear bras, and vinyl wraps just as long as they receive the same level of prep work as the car’s clear coat. So don’t hesitate to coat over these protective layers for additional durability.
Tips for Applying Ceramic Coating Products

When it comes time to apply a layer of ceramic coating on a car, the first thing you should be aware of is the environment in which it will be applied and the weather. Can the entire process be done outside? Sure. But being that you tend to have far less control over the types of foreign influence that can come into contact with a car’s exterior, the risk of having to redo a paint surface that’s rocking a layer of ceramic car coating is far greater outside. So to make sure that coated vehicle gets the loving it deserves, take the action indoors, and seek shelter within the confines of a garage.
As we explained earlier, anytime the temp drops below 40° Fahrenheit, or about 4.4° Celsius, it’s probably best to put the brakes on and wait for warmer weather or a heated garage option to materialize. The coating won’t properly cure (or cure at all) under high humidity either. So be advised that you’ll need to seek an indoors environment with a dehumidifier if the forecast calls for anything above 70% humidity.
In contrast, there is no high temp limit when it comes to the ceramic coating application process. Just note that higher temperatures require you to coat smaller sections at a time in order to prevent the ceramic coating from drying too quickly in between application and buffing. On the bright side, there probably aren’t a lot of people jumping at the opportunity of coating a car in 100°F weather, so this shouldn’t be much of an issue.
Weather aside, applying small amounts of ceramic coating in smooth, even strokes, and then allowing it to set before buffing the surface with a microfiber towel is crucial for the prevention of smearing and streaking. Apply too much product roughly or sloppily, and you’ll be forced to redo that area. Hop on the buffing stage too soon, and you’ll smear the partially liquefied ceramic coating and be back to square one yet again.
To avoid sounding like we’re dropping every chapter in the auto detailing history book on your desk, we’ll close with this final bit of advice. Properly applying ceramic coating to a car surface will protect it for years, so you might as well take the time and do it right the first go-around.
Want to learn more and nerd-out over a ton of tips on applying ceramic coating? You can tumble deeper down the ceramic coating “rabbit hole” by reading our definitive guide on applying ceramic coating. If knowledge is power, then AvalonKing believes in giving the power to the people. So stay informed, and keep on coating ya’ll. We love what you’re doing.
Quick Final Tip: If an indoor space is unavailable, and you must apply an automotive ceramic coating outdoors, seek the shelter of a carport and keep a close eye on the weather forecast. The more controlled and sterile the environment the better, so consider bribing a friend or family member with beer and pizza in exchange for commandeering their garage for a day or two.


Comments (38)
Hi Nathan!
You can absolutely do that. Armor Shield would act as the sacrificial layer for the existing coating.
Can you put Avalon King on top of another ceramic coating? I had my vehicle wrapped in XPEL Matte PPF and they put a “sport” ceramic coating on it. Listed as a 6 month to 1 year costing. Can I put Avalon King over this?
Hello Edmund!
I would recommend diluting that down a bit by mixing it with distilled water. You want to get the IPA down to between 15 and 30% 4 parts water to 1 part high should work.
What is considered a “properly blended isopropyl alcohol”?
I have 99.5% ipa. Is that sufficient for preparation of the surface for applying the ceramic coating?
Hi Marc!
Ideally, you would apply the 2nd coating after waiting 1 hour up to 24 hours. Wouldn’t recommend applying the second coating after 48 hours up to the date of first wash at around 7 days. Once you apply the 2nd coating the 48-hour clock resets and begins anew.
Should I still wait 48 hrs if I want to apply a 2nd coat?
Hello Bobby!
Well, that could be caused by several possibilities. Ceramic coatings caused crazy beading which the customers love but if left to dry like that in a hot sun could leave behind water spots. That’s certainly a possibility. Another cause could be from poor prep work and wax or other products trapped under the coating and manifesting as a spot. A few other possibilities could be: failing clear coat, bird droppings, sap, or even a top coat that was applied in direct sunlight or while the ceramic coating was still curing.
What would cause spots on paint after you ceramic car?