
Imagine a world devoid of bird crap, tree sap, road debris, exhaust soot, polluted rain, and assholes in overpriced sports cars flicking cigarette butts out the window. Now picture what would have to happen in order for this dream to become a reality…
Yeah… it ain’t happening.
All of the open road unpleasantries listed above, and many more like them, are why interest in nano ceramic coatings has skyrocketed in recent years. However, in order for a nano ceramic coating to work, there’s a bit more work that goes into the process than procuring a bottle of ceramic coating and slapping it on your automobile.
For a nano ceramic coating to live up to its full potential, one must obtain the right cleaning supplies, prep the surfaces they wish to coat, conduct any necessary paint correction procedures, and have a safe environment from which to work in.
Ceramic coating a car is by no means a difficult undertaking. It’s just a fuzz on the time consuming side.
For those of you who are unfamiliar with the mandatory DIY ceramic coating steps, here’s a little checklist. From purchasing considerations and prep work suggestions, to clear coat quick-fixes and aftercare, the following guide will show you what it takes to properly apply a nano ceramic coating, and then make it last.

Benefits of DIY Ceramic Coating
Having a shiny layer of ceramic coating can do lots of wonders for your car, and here are some of the benefits of having a DIY ceramic coating:
1. Long-Lasting Protection: By now, you already know the many advantages of having a ceramic coating for your car. A DIY ceramic coat also gives you the same result when applied correctly. Have an excellent pre-ceramic application preparation, and you’ll be guaranteed superior protection against contaminants like dirt, bird droppings, and road grime.
2. Cost Saving: Going to a professional auto detailing salon will cost you a lot of money. You’ll need to pay for the ceramic coating, and on top of that is the service you are getting. So, applying ceramic coating at home will reduce expenses and allow you to buy a high-quality DIY Ceramic Coating Kit with ease!
3. Flexibility: When using a DIY ceramic coat, you can choose the product you want to use. More than that, you also have the flexibility to schedule when you can work on the car project, which is advantageous if you don’t have plenty of free time. Instead of driving back and forth, you can set a day or two to finish the process at home.
Step 1: Prep It Like You Mean It

Regardless as to whether you are applying a nano ceramic coating, a paint sealant, or even a paint protection film (PPF), the key to a successful install relies heavily upon proper prep work. While manufacturer recommendations may vary depending upon what product is being applied, the following methods are widely revered as the core “four pillars” of surface prep.
Wash

Photo Credit: Pan The Organizer/YouTube
Removing any surface grime, dirt, and debris that may be sitting on the surface is the first step in creating a clean canvas for your nano ceramic coating.
Remember, you’re applying a semi-permanent layer of protection to your vehicle, so unless you like the sight of magnified bug guts embedded on your hood, scrub that ride like you mean it.
Washing the vehicle with the two-buckets-and-a-beer method both guarantees that cross-contamination is limited, and that ample amounts of refreshment are in plentiful supply. If you’re unfamiliar with this methodology, check-out our comprehensive article on vehicle cleaning, where we discuss in detail the car wash tools, chemicals, and best methods.
Clay

Photo Credit: LaCuraDellAuto.it/Facebook
Once all of the visible contaminants are removed, it’s time to get to lifting deeply embedded debris and invisible impurities.
The act of “claying” a car relies upon a clay decontamination product, a clean source of water, and a lubrication liquid. The latter of these can either be purchased, or easily whipped-up with the help of some surface prep shampoo and a dash of H2O.
As for the claying media itself, we suggest foregoing the traditional clay bar in favor of either a clay mitt or a clay towel. The reason being that these two products are both reusable and washable if dropped on the ground, whereas as a clay bar must be discarded if dirtied.
For more on the importance of proper clay prep, see our blog article focusing on the subject of claying a car ahead of a nano ceramic coating install.
Quick Nerd Note: All it takes is a dash of missed grime, and “poof,” that ceramic coating is struggling to solidify. So don’t skip the claying procedure, because contrary to common belief, clay decontamination products will not damage your car’s clear coat or harm window glass.
Paint Correct & Polish

Another one of the big myths about DIY ceramic coatings, is that they improve and remove car paint imperfections. That’s completely untrue. Nano ceramic coatings protect surfaces, enhance shine, and amplify whatever they affix themselves to, and will NOT cover-up flaws.
Unsightly surface blemishes stand-out all the more once a ceramic coating has been installed. So eliminating swirl marks, removing scratches, fixing fade, polishing away paint peel, and various other surface restoration steps might need to be implemented.
While a paint correction procedure may sound intimidating, it’s not nearly as difficult as one might think. Conducting a DIY paint correction procedure on one’s own has everything to do with having access to a garage, procuring the right body work tools and supplies, setting enough time aside, and having a dash of patience and practice.
So read-up, and hit us up if you have any questions. The AvalonKing team is forever happy to help.
IPA Spray

The final step in the DIY ceramic coating prep process is wiping down the entire vehicle with a properly blended Isopropyl Alcohol (IPA) solution.
Spritzing the exterior of the vehicle with a balanced IPA spray will allow you to remove any stubborn automotive lubricants, chemicals, waxes, polishes, and microfiber particles that might still be lingering on the surface.
Step 2: Buy Some DIY Nano Ceramic Coating Supplies
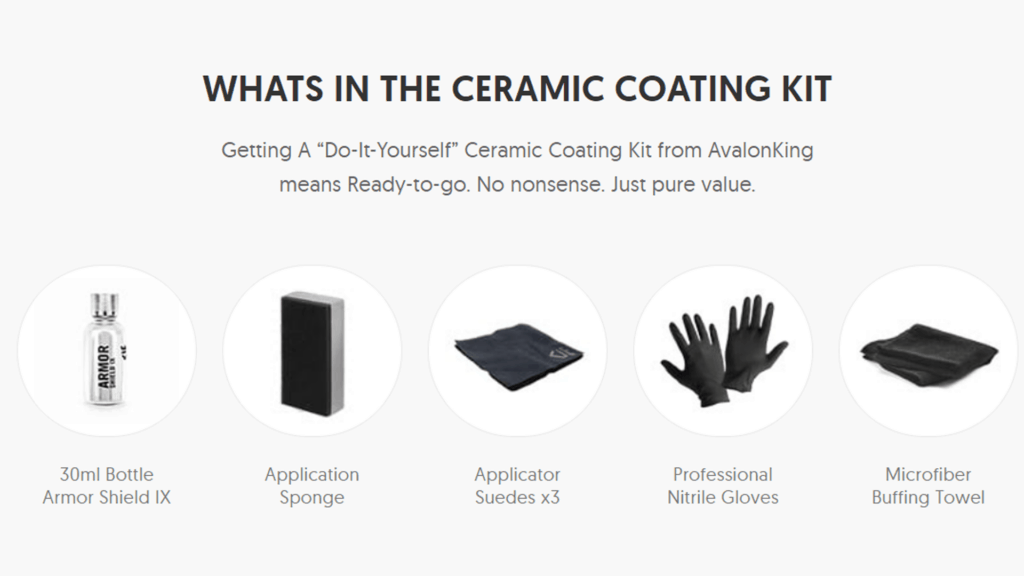
Any DIY nano ceramic coating product that’s worth a damn will come in a kit. Contained therein, you should find a set of clearly illustrated, easy-to-comprehend instructions, along with all of the required supplies for applying the protectant itself.
As an example, here’s the line-up of products you’ll find within every box of Armor Shield IX.
-
(1) Bottle of Armor Shield IX: A single, 30ml bottle of Armor Shield IX is enough to cover an average mid-size car, crossover (CUV), or a couple of motorcycles with a single layer of protection. Larger vehicles, like full-size pickup trucks and SUVs, will likely need two bottles, while three bottles is the norm for full-size box vans and machines of that caliber.
-
(1) Applicator Sponge: An applicator sponge is like a flat “paintbrush,” as it allows you to evenly spread the nano ceramic coating across a surface.
-
(3) Suede Applicator Cloths: Designed to be wrapped around the applicator sponge, these sheets of suede are what the ceramic coating will be dabbed onto prior to being smeared across a surface. Just be sure to replace the suede when it begins to get crusty, knowing full-well that each kit comes with three of these cloths.
-
(1) Pair of Nitrile Gloves: While there are no major health risks associated with coming into contact with nano ceramic coating when it’s in a liquid state, this stuff will dry your skin out rather quickly. So protect your paws, and if you have any concerns, be sure to reference our guide for safely applying a nano ceramic coating.
-
(1) Microfiber Buffing Towel: Once the ceramic coating has been applied, you’ll need to buff-away any “flashed” coating that materializes. A microfiber buffing towel is ideal for removing this excess and will help reduce the risk of scratching.
- (1) Set of Instructions: They say that real men don’t need instructions. Well, last we checked, instructions were crucial in the construction of virtually every automobile ever created. Don’t compromise all that prep work you just completed because you think you know what you are doing. Follow the damn directions, and hit us up if you have any questions.
Quick Tip: Focusing on one body panel or section of the vehicle at a time will not only keep a surface slick and easy to clean, but it will also guarantee that you don’t miss any spots. This is true for all care detailing scenarios, regardless as to whether you are in the surface prep phase, ceramic coating application stage, or are just giving your ride a scrub with a maintenance car shampoo.
Step 3: Apply the Nano Ceramic Coating
Once all of your prep work has been completed, either get right to ceramic coating the vehicle, or keep it safely locked away in a garage, well away from precipitation, airborne contamination, inquisitive felines, and hatchet-wielding children.
When you do begin the coating process, it’s important to make sure that all of the surfaces you plan on ceramic coating are as close to room temp as possible. Most ceramic coatings adhere best when applied to a clean surface that’s sitting around the 70° Fahrenheit mark, in an environment with relatively low humidity levels.
Quick Tip: It is imperative that you never apply Armor Shield IX nano ceramic coating in direct sunlight or in a high temperature environment, as it becomes incredibly tough to buff. A ceramic coating’s ability to properly harden relies upon having the ideal drying and curing temps, and high temps will cause it to solidify entirely too quickly. So save the hot and fast action for yakitori time, and stick with a cool and controlled ceramic coating approach instead.
The Nano Ceramic Coating Application Process

Wrap the supplied suede cloth tightly around the application sponge, tucking one end into the slit on the side. This will keep the cloth from coming off during application and discourage the formation of folds and wrinkles in the fabric.

Shake the bottle of ceramic coating with vigor prior to applying 6–10 drops across the surface of the cloth. Since the amount of product you will need to use can vary depending upon the surface being coated, keeping the cloth moist at all times is vital in guaranteeing that it glides across the surface with ease.
Quick Tip: In order to keep the suede applicator cloth loaded with liquid throughout the duration of the install process, periodically add drops of Armor Shield IX to the fabric. You’ll know it’s time to reapply when the applicator pad does not want to slide smoothly, and starts to snag on the surface. This typically occurs after 2–3 swiping sessions, and is easily remedied by reloading the cloth with a few drops of nano ceramic coating.

As you swipe the ceramic coating loaded suede cloth across the surface, always work in steady side-to-side movements, or in an up-and-down motion. Focus on one section of a body panel at a time, until the entire fender, door, hood, bumper, etc. has been completely ceramic coated.

Once you’ve finished coating a complete panel, let it sit for about 1–5 minutes, using the temperature range listed below as a point of reference. Once this drying time is complete, you’ll then proceed to the final buffing phase.
Temperature Range
50°F (10°C)
60°F (15°C)
70°–80°F (20°–25°C)
Length of Time
4–5 minutes
2–3 minutes
1 minute
Quick Tip: As you complete a body panel, keep an eye on that suede applicator cloth. If it begins to feel “crispy,” or if you can see the ceramic coating beginning to crystallize on it, swap in a fresh cloth. While you are doing that, take a moment to inspect the surface you just coated from multiple angles to ensure that the coating has been thoroughly applied.

The final step in the ceramic coating application process is the buffing away of any residue that may be sitting on the surface. This is what that plush microfiber buffing cloth is for, as it will safely remove this residue without scratching the surface.
As a nano ceramic coating begins to adhere and harden, excess product gets forced to the surface, which creates a rainbow effect, almost like when you mix oil and water. The formation of this rainbow haze is called “flashing,” and the hotter the air is, the faster it will occur. Just like that one time last summer, when your drunk uncle went down to the bus stop wearing nothing but a trench coat and a pair of galoshes…
Anyways… let’s circle back to the ceramic coating kind of “flashing,” shall we?
The minute you see that iridescent haze begin to form, lightly buff the coated area with a clean microfiber towel until that rainbow appearance has been wiped away. Just be sure to move quickly, because if you wait too long your ceramic coating is going to get super hazy, at which point it will become a real bastard of a removal operation.

After you’ve completely ceramic coated and buffed the entire vehicle, allow at least 1–2 hours of drying time. Then, if you feel that another round of ceramic coating is necessary, repeat the entire application process.
There’s nothing wrong with adding a second slathering of Armor Shield IX on top of the first layer of ceramic coating in order to make sure that you haven’t missed anything.
Just make sure that the first application has been given ample time to harden, and know that nano ceramic coatings don’t stack well after the second coating has cured. Any coatings past this point are a waste of time, energy, money, and resources.
Step 4: The Curing Process

Unless you are working in a temperature and humidity controlled garage, you will find that nano ceramic coating cure times will always vary. Humidity, heat, wind, and other ambient air considerations will all affect how a ceramic coating hardens, so follow the manufacturer’s curing recommendations and remain patient.
Premature contact with liquids, wind-blown debris, and members of the feline family with an affinity for automobile roofs and hoods are particularly adept at ruining nano ceramic coatings. So keep that in mind if you plan on ceramic coating your vehicle in an open carport or some other form of partially enclosed shelter.
Quick Tip: When it comes to Armor Shield IX cure times, AvalonKing’s product engineers recommend letting the vehicle sit indoors for at least 48 hours before exposing it to the elements.
Step 5: Ceramic Coating Aftercare

Once the nano ceramic coating on your vehicle has been allowed to cure for 48 hours, you can move the vehicle outside. However, keep in mind that you’ll need to wait at least seven days before giving the coating its first wash.
The reason for this, is because even though the ceramic coating has cured, it will continue to harden for another week or so. So if you want to make sure your vehicle is 100% car wash ready, and wish to expedite the process, park it in the sun once the initial 48 hour cure time is complete.
As for those of you who are looking to prolong the life of their nano ceramic coating, here are a few additional post-application aftercare tips to keep in mind.
- Wait at least 21 days after install before using a ceramic spray topper/booster.
- Always utilize the “two bucket” car wash method, using one bucket for rinsing the sponge/mitt, and the other for clean, soapy water.
- Wash the vehicle on a bi-weekly basis with a ceramic coating friendly car shampoo to avoid excessive contamination build-up.
- Use a separate scrub bucket, soap, and wash mitt for wheels, making sure to always clean them before any other part of the vehicle.
- Wheels scrubbed and rinsed, wash the vehicle from the top down, leaving the dirtier lower sections for last to prevent cross-contamination.
- Avoid washing in direct sunlight to minimize streaking and hard water spotting.
- Always wash and dry with high-quality microfiber, as it will reduce the risk of scratches and absorb more moisture.
Best Practices for Maintaining a Ceramic Coated Car
What's next after deciding to ceramic coat your car and let it fully cure? It is - maintaining your ceramic-coated car!
It doesn't matter whether you did the ceramic coating application yourself or let a professional detailer handle it. What’s important is keeping it in good condition after application.
Below are some of the best practices you should take note of to make sure your ceramic coating lasts long:
1. Car Washing: After ensuring your car’s coat is fully cured, start with a routine of washing at least every week (if possible). Washing your car has a pretty simple objective — keeping it away from potentially damaging substances for an extended period. However, not all car wash methods are recommended, and only these would help maintain your ceramic coat for a long time:b. Non-Touch Car Wash: You can use these facilities if you don’t have time to wash your vehicle at home and have a non-touch automated car washing facility near you. Just avoid those who use rigid brushes that might scratch your coat during the process, and you must ensure your vehicle is completely dry before leaving.
c. High-Pressure/Foam Cannon: Getting your car washed with a high-pressure or foam cannon every few weeks can help remove debris left on the surface of your coating. You can use this with the traditional two-bucket hand-washing method to remove bonded contaminants altogether.
2. Regular Inspection: When a professional does your ceramic coating, they are usually covered by warranty packages. However, if you decide to do the ceramic coating yourself, you should regularly inspect your car’s coating and ensure it is in optimal condition. During the inspection, check for the following:
a. High or low spots
b. Uneven Coverage
c. Find Minor Scratches
d. Refresh the Coating (if necessary)
a. Ceramic Maintenance Shampoo
b. Microfiber Towels
4. Avoid Harsh Chemicals and Brushes: Soaps with high pH, like industrial detergent or mop-type cleaning rags, will only wreck your ceramic coating in minutes. So, avoid these at all costs if you don’t want your effort of applying a DIY ceramic coat to go to waste!

Common Issues and Solutions
Most issues that arise when you apply ceramic coat are caused by human error – before, during, and after application. This is why we always emphasize how important research is when using DIY ceramic coating. Let’s look at the most common challenges and possible solutions below.
Possible issues with ceramic coating application
Improper application of ceramic coating can cause many problems that nobody wants for their car. After all, you’re applying a coat to your vehicle to protect it and not add additional damage, right?
However, like most DIY projects, it’s understandable that you will have a few issues if you do not prepare thoroughly before applying. Among a few you might encounter include:
Solutions for fixing any imperfections
A few issues regarding ceramic coating should be fine. Fixing a lousy DIY ceramic coating is possible only if you immediately distinguish the problem. Below are a few solutions for the most common issues one can encounter when applying ceramic coat:
- Hand polish the imperfections as soon as possible: If you’ve noticed that there are significant imperfections (e.g., high spots, streaking, thick application) after leaving the coat for a few minutes, all you need to do is polish out the uncured coating with a silicon-based polish and microfiber applicator.

Steps to safely remove or replace ceramic coating if needed
In most cases, we recommend seeing a professional auto salon to remove the coating for you. The reason is that removing the coating might damage the paint layer, so it is best to avoid it if it is unnecessary.
However, if this is your last resort and all possible solutions have failed during the application, here are a few tips for safe removal:
1. Clean the Car: Before removing the coating, make sure your vehicle is free from dust or unwanted contaminants. Proceed with using the two-bucket method and high-quality soap. Also, make sure to rinse it thoroughly and let it dry by using a clean microfiber towel.
2. Strip the Ceramic Coating: You can use a clay bar or chemical stripper to remove the ceramic coating from your vehicle’s paint. When buying products, always check with the seller if they already come with instructions on how to use them. Usually, you’ll apply the substance or use the clay bar to wipe and scrub off the ceramic coating and repeat it until the entire layer gets removed.
3. Polish the car’s surface: After removal, do not miss polishing the surface of your vehicle. It will help remove residuals from the chemical stripper or clay bar.
Parting Shots

Despite being a tad on the time consuming side, the application of a nano ceramic coating is a super simple process. No need for extensive paint correction knowledge, or a familiarity with paint and body work here, as the tips and information listed above offer more than enough insight into the matter.
That being said, if your paint has severe surface scratches or signs of fading, it might be time to let a professional detailer step in, for paint correction procedures can be a bit time and tool intensive.
As for all things DIY ceramic coating related, feel free to hit-up one of our AvalonKing customer care specialists. We’ve got years of experience, tons of insider info, and a slew of new detailing products for purchase to help keep that ride of yours squeaky clean and heavily armored.
Frequently Asked Questions
When it comes to learning how to apply ceramic wax, there are a few frequently asked questions that we’re going to answer below.
Is it hard to ceramic coat a car?
Ceramic coating a car may seem daunting, but if you use user-friendly products (and high-quality ones) like Avalon King’s Armor Shield IX Max DIY Ceramic Coating kit, it will be easier for you to DIY. Successful ceramic coating application is achievable with proper preparation and adherence to the instructions.
Can I ceramic coat my car myself?
Yes, you can ceramic coat your car on your own. However, to avoid issues, you should thoroughly research the preparations you need and the product you will use. DIY kits like Avalon King’s Armor Shield IX, complete items like prep spray, shampoo, and buffing towels, will help you coat your car at home.
Can ceramic coating be done in 1 day?
The application of ceramic coating should not be fast-tracked, so usually, it takes at least 3 days to finish when taken to an auto-detailing shop. Meanwhile, when you use Avalon King’s DIY Ceramic Coating at home, it’s easier to apply, so it won’t take much of your time (2 days at a maximum). Generally, the process includes washing, preparing, coating, and drying the coat. Another one or two weeks will be needed to fully cure the coat before washing your car.
How long does ceramic coating last?
Ceramic Coatings usually last between two and five years. In some cases, it can last up to a decade, but this will depend on the product you use and how much care you give to maintain it. So, before it gets fully cured, ensure everything is applied smoothly. It’s also advisable to have a good IPA Spray and use Ceramic maintaining shampoo to keep your vehicle’s coat durable.
What if it rains after ceramic coating?
Rain does not really have a negative impact on ceramic coating, but it is important to allow the coating to fully cure first. Ensure it has dried thoroughly, and avoid exposing your car to extreme temperatures at least a day after application. In fact, if you can keep your car inside the garage for a week, that would be better.
Does sunlight damage ceramic coating?
Sunlight does not damage ceramic coating as long as it has already been fully cured for at least one day. Keeping it from sunlight or extreme weather exposure will help the chemicals set much faster. In fact, once the ceramic coating is applied, it can even help block UV rays, protecting your vehicle’s paint.
Does ceramic coating crack?
Ceramic coatings, when applied correctly, do not crack under normal circumstances. They are designed to form a durable and flexible layer on the surface of the vehicle, so it’s crucial to follow the manufacturer’s guidelines regarding application thickness and curing times. Avalon King’s DIY ceramic kits come with a step-by-step process on how to ceramic coat a car, so it’s already less of a worry for you.


Comments (87)
I plan on doing all recommended steps up to the polishing point.I don’t own and never used a polisher.Can I skip that step or do you recommend a hand polish.My vette paint is in good shape need your guidance.
Thanks,
Bryan
Hi , I just did Armor shield max ceramic coat . I applied psycho ceramic detail spray on the top of it after 12 hours to make car surface more slicker . Is this process not gonna affect my ceramic coating surface right ? Like make ceramic coat weak or something like that .
How many days after application is rain water and morning dew safe for the coating? The old documentation said 4 days I believe. Is that still the recommendation?
HI Kiran! Yeah that should be fine. be cautious of where the tie downs occur as rubbing on the coating and lead to the coating being damaged in those areas.
After the 48 hr cure time, can I put my car cover back on or should I wait additional time before putting the cover back on?
Hi Kyle!
That shouldn’t be an issue at all. just wash and IPA wipe the areas and reapply to those sections. The coating self-levels so that should be an easy fix!
So I coated 12 days ago, just did my first wash using recommended shampoo and noticed a couple panels that are not beading properly like the rest of car. I’m pretty certain I used too much product in these spots and it did not flash properly. My question is, can I not touch up/coat these small areas now? I’ve read where you’re not supposed to coat again after 24hrs, am I stuck w the results aside from completely redoing the coat (machine polishing etc)? Please help, thanks!
Hello Parker!
No we do not recommend that. The suedes are 1 use and discard. The coating is difficult if not impossible to rinse off and that’s by design.
If you don’t finish the ceramic coating can you wash and reuse the suede cloth the next day?
You shouldn’t use a ceramic wash product before applying a ceramic coating. The ceramic coating from Avalon King provides the base layer for all other layers to lay on top of. So, after you’ve applied Avalon King then you can use that car wash soap/method. Avalon King advises to wait 21 days till after your initial coat to begin adding layers like your soap you mentioned.