
Regardless as to whether you’re rolling around in a heavily armored 4×4, a paint protection film wrapped supercar, or a heaping hunk of rust and regret, rock chips, dinged doors, paint surface scratches, flat tires, and equally flat batteries remain a constant threat.
Even with a really good car insurance agent on call and full coverage, turning toward a professional for every puny problem that surfaces, or unpleasant accident that occurs is going to cost some serious coin.
So if you are looking to save some cash, or merely want to try your hand at auto repairs, recalling the following five DIY car fixes is going to be a great start. So roll-up your sleeves, get out those gloves, and prepare for some DIY time, because when our automobiles are at risk, and repairs appear too steep, it’s time to get creative.
1. Repair a Damaged Windshield

Chipped windshields are the canker sore of the automotive world. Puny yet painful, and plentiful beyond compare, these unsightly cracks in our glass are a royal pain in the ass.
However, most windscreen rock chip repairs are a fairly easy affair, even if they may appear quite intimidating at first glance. If the chip isn’t too bad, and a massive crack still has yet to develop, a quick DIY repair, followed by a little curing time will often yield stellar results.
While glass repair specialists tend to charge upwards of $50 a pop to fix a chip in a windscreen, most DIY windshield repair kits only run about $10-20. As long as it is not raining, this fix can be completed in your driveway, carport, garage, makeshift garage alternative, or nuclear fallout shelter in just a few short minutes.
Quick Tip: Just like prepping for a ceramic coating, thoroughly decontaminating the rock damaged area is vital for repairing a chipped windshield. Adhering to the manufacturer’s recommended installation steps and cure times is equally important, as it allows the liquid to fill-in the damage, stop the spreading of cracks, and form a lasting bond.
2. Remove Scratches

There are a lot of hacks out there on the internet regarding scratch repair, ranging from the professional and creative, to the questionable and laughable. While deep scratches will more than likely require the use of things like body filler, high-build primer, wet sanding, and paint touch-up, surface scratches are a far more straightforward affair.
You can often remove mild surface scratches, like swirl marks and mild spider webbing, with little more than a polishing compound set, some polishing/buffing pads, a cold six-pack, and some serious elbow grease. Naturally, there’s a bit more to it than gathering supplies and getting to buffing, so be sure to check-out our blog article focusing on the four most common kinds of scratch repair for more details.
3. Pull Dents and Door Dings
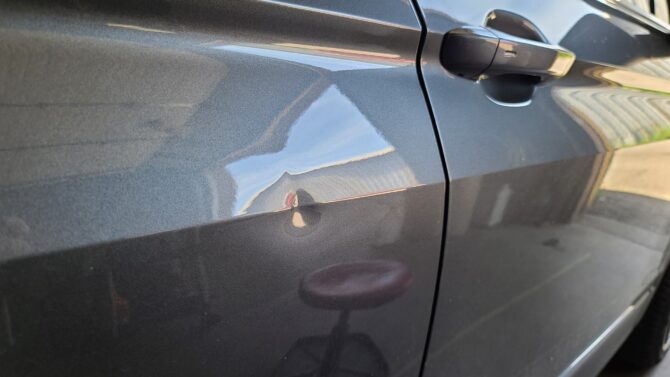
Most forms of moderate to mild dent repair can be completed on one’s own over the span of an afternoon, and no, you won’t need to drill holes in your damn car. Is dent pulling a time consuming endeavor? For sure. But when done right, the results are sure to amaze, as will the massive amount of money you will have saved.
In order to pull dents from a car, you will first need to procure a paintless dent puller and have access to a nearby electrical socket. While pricing depends heavily upon the size of the kit and the brand, but most dent repair sets tend to range anywhere from $30-150, with the safest, and most effective tool in these kits being the clamp-style dent puller.
To use this tool, simply add dabs of the included paint-safe hot glue to the “pull button” that best fits the dent, press it firmly into the indentation, and allow the glue to cool. Once hardened, place the puller clamp over the button, sliding the notch on the end of the plastic button into the puller’s metal shaft.
Adjust the spring-loaded knob at the end of the puller to a height that will allow you to apply even pressure to the surface. Too little pressure will not yield any results, while too much may damage surrounding areas, so dial things in carefully. Once a safe amount of pressure has been selected, begin pumping the hand lever in quick bursts until the button pops off, at which point you will need to peel away the old glue, reapply a new layer, and try again.
You will likely repeat this process a few times before the ding fully disappears, so keep at it and remember to not pull too hard or you may cause creases. Dent pulled, be sure to hit the area with a high-quality surface prep shampoo, some H2O, and a mild clay decontamination product to remove any stubborn glue that may still be hanging around. After that, it’s time to break out the microfiber buffing towels, get your shine on, and move on to the next repair!
Quick Tip: The plastic glue scraper included with most paintless dent pulling kits tends to be super flimsy, and therefore does not work very well. To negate this annoyance, reach for the flat scraper commonly found within most poly/nylon trim and upholstery removal tool kits. This tool will do a far better job of removing the hardened glue from the dented area, and will not damage the paint.
4. Rust Prevention

Rust prevention is another one of those DIY undertakings that may seem intimidating at first glance, but is actually a far easier task than one might think. The hardest part is gaining access to a car lift, because without one you’ll be working on the ground, which quite frankly… sucks.
While pressure washing the underside of the vehicle is definitely a good first step (especially if you live in a part of the world where the roads get treated in winter), a quick spritz from a garden hose equipped with a sprayer nozzle will also work in a pinch.
Once dry, all you’ll need to do is clean-up the nastier bits of rust with a wire brush and some mild grit sandpaper, wipe or rinse the area down again, and throw a layer or two of rattle-can rubberized undercoating at the vehicle’s underbelly. This job may be a bit dirty, and typically takes about an hour or two, but it will save you hundreds of dollars when compared to a professional install.
Quick Tip: A rust inhibitor may not be necessary, but on older vehicles that see lots of road salt, its implementation is probably a wise decision. Just be sure to wear protective eyewear, gloves, and ventilation gear, because airborne rust and automotive undercoating particles are pretty damn toxic. For more information on rust prevention, be sure to read AvalonKing’s guide to automotive undercoating for more in-depth coverage of this subject.
5. Deep-Clean an Engine Bay

This final DIY car repair is more of a preventative maintenance measure than a quick fix. Engine bays get absolutely filthy when a vehicle is driven regularly, and this build-up can lead to metal corrosion, electrical glitches, and even premature component failure if allowed to fester.
Deep-cleaning your car’s engine bay once a year will not only help guarantee that the mechanical and electrical components contained within it function properly, but it will also make things like checking fluid levels, exchanging air filters, and testing fuses far less filthy in the future.
In order to safely deep-clean an engine bay, start by wrapping any exposed electronics and air filters with plastic bags and rubber bands. Protective bagging in place, pre-wash the bay with your sprayer nozzle or a pressure washer that’s been set on its mildest setting.
Bay fully sprayed, liberally apply either an automotive approved degreaser or a strong surface prep shampoo that’s been blended with H2O to the entire area, allowing a minute or two of soak time to occur before breaking out the detailing brush. Surfaces scrubbed, rinse the bay one more time, and look for any areas that may have been missed. Scrubbing and rinsing sessions complete, either allow the bay ample time to air dry, or use a leaf blower or air compressor to blast away any standing water.
After that, all you’ll need to do is remove those plastic bags from any sensitive electrical components, hit any low-heat surfaces with an all-purpose trim conditioner, and stand back to admire the glow emanating from your super clean engine bay.
Parting Shots

Deciding whether you should contact a professional or tackle a quick car fix or moderate automotive repair on your own boils down to personal preference, DIY experience, funds, and setting time aside.
A good rule of wrench to follow, is that if the job appears to be outside of your wheelhouse, chances are you’re going to mess-up more than you’ll fix. That’s why having someone present who is familiar with the repair you wish to make, and who can offer guidance along the way is more valuable than any online advice you will ever encounter.
So when in doubt, reach out. At the very least you might find a friend or family member who is willing to help you drink that six-pack of suds, while making sure that you don’t royally screw-up your automobile.

Comments (0)
There are no comments for this article. Be the first one to leave a message!