
There are several ways to skin a cat – but ceramic coatings are more complex. Ceramic coatings are designed to provide a semi-permanent bond to a surface, protecting it from exposure to UV rays, chemicals, bird droppings and other contaminants that damage automotive parts.
Applying these coatings have become easier than in years past. In fact, our DIY nano-coating is considered by many automotive enthusiasts as the easiest and longest-lasting coating – that compares with several professional-grade ceramic coatings.
However, eventually, you’ll have to remove the excess ceramic coating if you want to reapply to your valued ride. The key is learning how to do this without scratches. So – how do you remove a ceramic coating or sealant from a car? Are there special tools or supplies needed to avoid swirl marks, and are there certain techniques that work better than others?
These are a few of the questions we’ll dive into today. In the information below, we’ll provide a definitive guide to removing the ceramic coating from your car. Let’s get to it.
Why Would You Remove a Ceramic Coating?

The most popular reason why car owners look to remove a ceramic coating is to apply a newer coat. Whether you’re going back to car wax or stepping up to a professional-grade ceramic, removing the older layer is the first logical step.
As explained above, DIY nano-ceramic coatings are intended to provide a semi-permanent layer of protection – meaning eventually, they’ll wear thin. However, they won’t always wear completely off.
In fact, most ceramic coatings that use nanotechnology to infuse onto porous surfaces slowly wear with car washes, reducing hydrophobic and protection abilities the longer they stay on the vehicle. When the vehicle surface beings to show signs of a worn-out coating, they should be removed – so you can reapply a fresh coating.
There are some specific reasons why many car owners ask about removing coatings as well.
Completing or Repairing Body Work
In most cases, if you’re not looking to reapply a new coating, carnauba wax, a clear bra or paint protection product, you’ll remove ceramic coatings to fix the damage done to bodywork on a car, truck, or SUV.
If you’re repairing existing damage, the work completed during the repair process, including sanding, buffing, and prepping the surface for fresh paint, will likely do the job.
Swapping to a New Paint Protection Solution
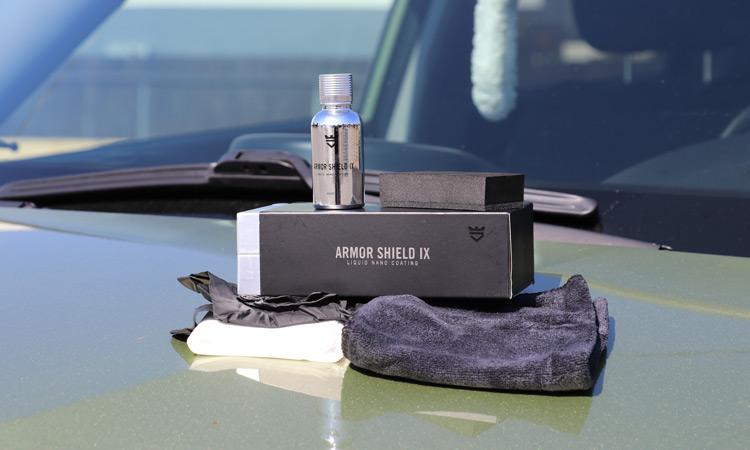
We get a lot of questions from customers of other nano-coating products that are looking to try Armor Shield IX. In this instance, the current condition or longevity of the coating will determine what removal steps you’ll need to take. Most nano-coatings last a few years – so, the fresher the initial application – the harder they are to remove.
You’re Going to Repaint the Vehicle
Another reason you’d likely remove a ceramic coating is if you’re looking to repaint the vehicle. Now, obviously, paint prep work includes sanding, removing the clear coat, and likely the primary base coat as well. This will remove any coating – period.
*It should be noted, that if you’re going to repaint a vehicle, you need to wait for at least 30-days after the paint and clear coating are done before attempting to apply a DIY nano-ceramic coating.
Importance of Proper Preparation Before Removal
Since ceramic coatings are designed to be durable and long-lasting, removing them can be more complicated and more complex than wiping off a spill.
That being said, proper preparation is essential because it helps ensure you have all the necessary tools and products. It also helps assess and determine the level of care required during the removal.
Below are a few steps you have to go through before removal.
Washing the vehicle
If you used a high-quality ceramic coating on your vehicle, start with a thorough car wash and grab a pre-wash product. Spread this over your car’s paint and wait for foam to appear. Using dishwashing soap is not suggested, so ensure you have an abrasive or wax-stripping shampoo.
You can then use the two-bucket method or even a foam gun to wash it. You can repeat the process until the car is washed to make sure that you remove any remaining loose dirt and debris.
Clay bar treatment
If you are curious whether you can use a clay bar for a ceramic-coated car, the answer is yes – and actually, this is the next step of the preparation.
After washing your car, do the clay bar treatment to remove contaminants like road grime, tree sap, dust, bird droppings, and more from your car paint’s surface.
Many clay bars are available in the market, so get a high-quality one to avoid scratches. If you plan on doing this yourself, just take your time and rinse it thoroughly when done. Don’t forget to dry it with a good-quality microfiber towel!
Surface decontamination
Even if your car looks squeaky clean after washing it, several particles will still be lodged on its surfaces and pores. So, surface decontamination is crucial to ensure a smooth removal process.
If you’ve already finished using the clay bar for decontamination, you can use the IPA spray or ceramic coating prep as a final prep if you apply a new coating.
Three Ways to Remove a Ceramic Coating
I am a strong believer in doing things ‘the right way’ the first time. With that said, when it comes to removing a nano-ceramic coating, it’s very difficult to correctly identify the perfect and right method – without knowing the current condition of that coating.
A general rule I follow is to use a different removal process based on the type of coating used, length of application, and the product you’re planning on applying after the old one is gone.
However, removing ceramic coatings also depends on your comfort level and experience with mid-level to advanced paint correction techniques. It also depends on the surface, whether it be a car’s body, glass, plastic trim, or anywhere it’s applied. It’s also important to verify that your ceramic coating removal method will not cause swirl marks or additional paint damage.
So, to simplify the task of removing ceramic coatings, here are four proven methods for removing any paint protection coating.
Contact the Manufacturer of the Paint Protection Product
This might seem to be weird, but believe it or not, most manufacturers of waxes or chemical paint protection products know how to remove their stuff the best. Formulating a paint protection product like a ceramic coating takes time and loads of R & D.
If you know what type of coating you have currently on the vehicle, reach out to the manufacturer and ask them what they recommend. This also applies to car wax, paint sealants or ceramic coating sprays.
For those of you looking to remove a ceramic coating like Armor Shield IX, we suggest attempting one (or all) of the following three removal methods, all of which work pretty damn well. Naturally, the steps listed below are based upon the longevity of the coating, and not specific brands or products.
3+ Years – Clay Bar and Washing
If you have a high-quality ceramic coating – with a SiO2 percentage above 80, it’s best to remove it by clay bar and hand washing. At this point in its lifespan, the coating is likely going to be very thin and relatively easy to remove.
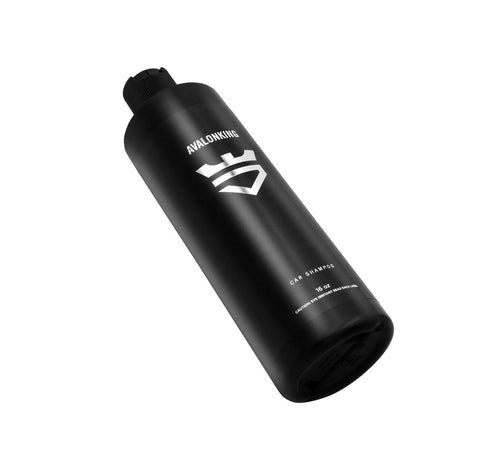
Using a wax-stripping car shampoo as a pre-wash is a great idea to begin this process. This is the same type of automotive soap that we recommend as a pre-wash for prepping your vehicle surface. In fact, if you follow this process, you’ll be pretty much ready to reapply a new coating.
Step 1 – Wash with a Wax Stripping Car Shampoo
Using the two-bucket method, and even perhaps a foam gun, wash the vehicle with an abrasive or wax stripping shampoo. While it’s tempting to use dishwashing soap, it’s not the best solution. There is some great wax stripping car shampoos out there – and until the day we launch our new product (coming soon folks) – you can use any of them.
If you’re looking for a quicker and more efficient method of removing the coating safely, consider using a car wash with polishing abrasives. It’s basically like washing and polishing at the same time.
Step 2 – Complete a Clay Bar or Clay Mitt Treatment
The second step for removing an older ceramic coating is the clay mitt or clay bar treatment. In this, you’ll use a high-quality clay mitt along with a concentrated car wash shampoo lubricant. There is some clay bar specific lubricants – but you can use a high-suds producing car shampoo mixed as 1oz soap to 1 liter of water.
Step 3 – Spray Clean with Fresh Water and Dry with Microfiber Towels
Once the clay bar treatment is complete, you should rinse the vehicle completely, and dry with a microfiber towel. Don’t be afraid to use a fresh towel with each body panel.
When the vehicle is completely dry, use an IPA spray or ceramic coating prep wipe down the product for final prep before applying the new coating.
Less than 3+ Years – Polishing
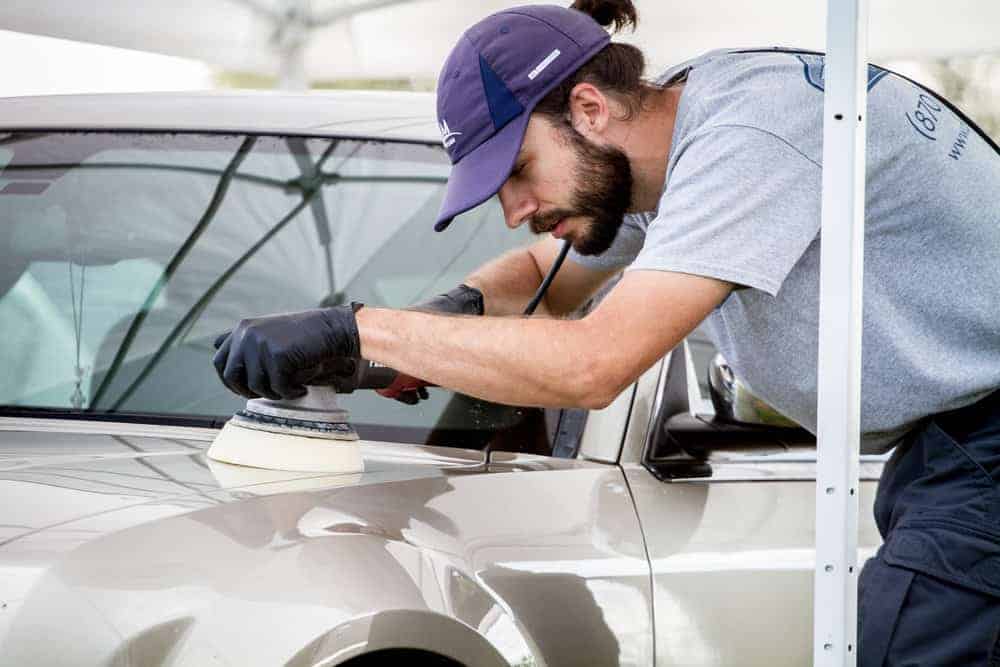
Most professional detailers swear by using a polishing compound and orbital polishers as the best way to remove a newer ceramic coating. This is simply due to its ability to ‘cut’ into the very hard coating until you reach the actual clear coating.
Here is the problem with this method though – it’s one that requires experience with polishing and knowing when you’ve cut through the ceramic coating – and not too deep into the clear coat.
Most professional detailers will take a gradual approach to remove ceramic coatings with cutting compounds. Essentially, this means they’ll start with a medium-grit cutting compound, then step down in grit percentages – until the coating is fully removed.
Again – this takes skill with the orbital polisher and knowing how and when the coating has been removed.
These are a few tips I suggest for using polishing compounds to remove ceramic coatings.
First – Gather Your Supplies
If your coating is less than 2 years old, I would start by using a medium-grade polishing compound along with several microfiber cutting polishing pads. You should also use a thin or finishing compound for the final removal and prep work.
Second – Wash the Car
Once you’ve gathered everything, wash your car using the two-bucket method with a wax stripping shampoo. This might help to loosen up the coating – but not likely. It will, however, ensure any debris on top of the coating is removed.
Third – Start with the Polishing
Instead of writing this all down, I think it might be better for you to watch this video – which in my opinion, is one of the better ones on the “NET” that introduces paint correction for beginners. It might seem elementary to many of you – but trust me – it’ll help introduce some best practices.
Polishing and Reapplying The Coating (Optional)
Washing, rinsing, and surface decontaminating are sometimes enough to remove the old, worn-down ceramic coating.
However, if you are removing a layer of coating that’s quite new and wasn’t easily removed during the process, there’s an option for you to polish it before reapplying for another coat.
Polishing and reapplying a new ceramic coating is optional, but you can think of it as giving your car a spa treatment. In fact, many high-grade professional ceramic coating products claim that the only way to remove them is through polishing.
Here’s a quick rundown on how to work on the process.
Assess the condition of the paintwork
Before polishing and re-coating, you must assess the condition of your car’s paintwork.
To determine if your car needs polishing (or paint correction), here are a few things to look out for:
- Minor imperfections
- Swirl Marks
- Paint Chips
- Light scratches
If you see the abovementioned things, you should polish your car first. Meanwhile, we suggest getting the paintwork done for all major scratches, bumps, and impacts.
However, if your paint is already smooth and clean after washing and using a clay bar, you can skip the next step!
Choose the suitable polish and applicator pad
Since the ceramic coating is only a physical layer, mechanically polishing it removes the clear coat altogether. However, choosing the suitable polish and applicator pad is crucial to ensure it will do its job.
Look for high-grade lubricant and use fine sandpaper on the surface of your car when polishing. You can start with 3000 grit and, later on, lessen it until you see the ceramic coat wear off.
Meanwhile, you can start with a medium cutting pad and a medium to light polishing compound for your machine polisher. Apply an appropriate amount to the buffer before dabbing it to your vehicle’s surface.
Proper technique for applying the new ceramic coating
Applying a new ceramic coating after removing one is relatively easy but not simple. You’ll need a lot of time and effort to do this, so ensure you know the proper technique before applying it.
So, after making sure your car’s exterior is smooth and clean, you can now proceed to do the following:
- Wash and rinse your car: Begin with a clean yet dry car because you wouldn’t want to lock any dirt before applying a ceramic coat.
- Get the right safety equipment: Applying ceramic coating involves chemicals that can harm your skin, eyes, or lungs. Ensure you have all the necessary safety equipment (we’ll discuss this further below).
- Add Ceramic Coating to Applicator: Suppose you purchase Avalon King’s Armor Shield IX DIY Ceramic Coating Kit. In that case, it will already come with a complete set consisting of coating, applicator sponge, applicator cloths, and buffing towels to make application easier.
- Wipe Away Excess: Do not forget to wipe the top layer after letting the coat dry so it won’t look rough due to uneven finish.
- Let your Ceramic Coat Cure: After finishing the steps above, you’ll need to wait for the coating to harden for at least 48 hours.
- Use Post-Ceramic Maintenance Shampoo: Avalon King offers a specially formulated ceramic maintenance shampoo to help keep your car squeaky clean.
Safety Precautions During the Removal Process
Although removing ceramic coating may not involve extreme danger, it still requires a level-headed approach. There are a few precautions you should look after, which we will be discussing below.
Protective clothing and gear
While not mandatory, it is highly suggested that you work with protective clothing and gear while working on the removal of your ceramic coating. A few things you can prepare and use are:
- Nitrile Gloves
- Respirator Mask
- Protective Glasses/Google
- Closed Toe Shoes
- Comfortable clothes that cover your skin
Ventilation and working in a well-lit area
A mix of chemicals makes up the ceramic coating, so a well-ventilated workspace is the most important thing to keep you safe from intoxication. Your garage is an excellent workplace, but open those windows, fire up a fan, and let the fresh air in.
Working in a well-lit space is something to consider as well. Not only will it ensure precision, but also minimize the risk of accidental mishaps.
Maintaining Your Newly Cleaned Surface
Maintaining your newly cleaned vehicle after removing the ceramic coating does not need professional or auto salon help. It is even by far the easiest part of the process!
You can easily do it yourself with the help of a few recommendations.
Regular cleaning routine
Establishing your regular cleaning routine for your car is the first key to keeping it well-maintained. We suggest you schedule at least one a week of cleaning to lessen dirt pile up.
After creating a schedule, gather all the needed stuff and finish cleaning. Remember to do this carefully and only use high-quality products like microfibre towels and light scrubs. You don’t want to have swirl marks and scratches on your car!
Proper washing techniques
You can use many washing techniques for your car, such as two-bucket washing and special ceramic shampoos. These are just simple methods of cleaning that only require a few products, including a washcloth, soap or shampoo, and water!
Policies for using automated car washes
One pro tip: Avoid going to automatic car washes as much as possible. Sometimes, their brushes can contain abrasive bristles that can easily scratch your car.
While some car washes may be safe bets, it is sometimes not worth the risk. But, if you don't have a choice and must visit one, the safest course of action is to look for touchless or brushless car washes.
Common Issues During The Removal Process
During removal, your car might encounter a few issues if you do not follow the preparation correctly. Let’s discuss them along with possible solutions to fix them.
Streaking or smearing after chemical removal
Improper use of diluted alkaline solution, clay bar, or abrasive brushes might be the culprit to streaking or smearing after removal of the ceramic coat.
That is why it’s essential to do proper research before proceeding. Re-evaluate your technique, consider using only high-quality products, and maybe ask advice from a professional.
Ineffective polishing results
If you do not do the polishing job correctly, you might have to redo it or, worse, have the paintwork re-done.
So, you should consider a few of these factors to avoid ineffective polishing results:
-
Re-evaluate Products: You should ensure you’re using compatible polish because mismatched products can cause damage to your car’s paint.
- Check Applicator Tool: We’ve suggested what applicator pad to use when polishing your vehicle’s surface. It’s also important to check if the pad suits your chosen polish.
Damage to paintwork during mechanical removal
While using machine polishing to rub the coating away works effectively on all kinds of coating, it’s still important to assess if there’s still a need to do it. The reason is that a car’s paint job can become easily damaged, even more so during mechanical removal.
You can avoid this by using the correct product and applying the proper technique during mechanical removal (refer to the discussion above).
Frequently Asked Questions (FAQs)
We’ll be answering below a few of the frequently asked questions about how to remove Ceramic Coating.
Will acetone remove ceramic coating?
The use of acetone to remove the ceramic coating is not advised. There is no chemical method of removing it; only a long process of washing, rinsing, decontamination, or polishing will help remove the ceramic coating on a car.
Will a clay bar remove ceramic coating?
Yes, clay bars can remove ceramic coats with proper technique and usage. Without the right research, using clay bar treatment will not only remove the ceramic coating but might also damage your car’s paintwork.
Does isopropyl alcohol remove ceramic coating?
The use of isopropyl alcohol cannot remove ceramic coating. Instead, you can use a correctly blended mixture of isopropyl alcohol (10%-15%) and water (85%-90%) to clean your vehicle.
Does vinegar remove ceramic coating?
No, vinegar cannot remove the ceramic coat. Vinegar is acidic and can be used as a mild solvent. However, ceramic coatings are built to be quite resistant to acid. When cleaning your car, you can use vinegar instead to dissolve mineral deposits or water spots.
Will vinegar harm ceramic coating?
There is no clear answer to the effect of vinegar on ceramic coating. While clear coats are designed to resist acid, prolonged or frequent exposure to acidic substances (like vinegar) could impact their longevity. So, we suggest avoiding using vinegar in cleaning your car if it is unnecessary.
Wrapping it Up
Armor Shield IX, is engineered to last between 2-5 years on average, and is covered by a two year guarantee via AvalonKing’s warranty program. When properly installed and maintained, people tend to see 4 to 5 years of protection.
Just remember that if you’re thinking about applying a new coat, always be sure to remove the old coating first so that you have a fresh canvas for the next coating to adhere to and protect.
One thing you don’t want to assume is that applying a new coating on top of an older one will work. Ceramic coatings (like our product) do not layer on top of each other. They work by bonding onto the porous surface. If you have any questions about removing prep work for applying Armor Shield IX, comment below and I’ll be certain to reply promptly.
Here at Avalon King, we provide one of the best DIY ceramic coating kits that are durable enough to last a long time. Check them out here!


Comments (12)
I wish to apply a double sided tape emblem to my newly ceramic coated vehicle. Do I have to remove the coating for that small spot and if so how ?
When buffing a ceramic coat what kind of lubricant do I use
Hi Tony!
That one should be rather easy to fix up by just doing the IPA and application over the missed area. You could overlay on existing coating if that is easier or perhaps just redoing the entire roof section.
I applied your product last year before I put the car in storage; it looked great when I put the car cover on. When I took the cover off and pulled it out of the garage a few weeks ago, I noticed a hand-sized patch in the middle of the hood that doesn’t appear to have been coated. Can I wash it, wipe the hood with IAP and apply another coat, or am I going to have to strip the whole hood and start over?
Hello Andrew!
We would definitely recommend trying to buff that out first. Polishing would in effect remove the coating. Email us at hello@avalonking and we’ll further assist you in troubleshooting the situation.
I finished my install on a brand new vehicle but now in better sunlight, I notice streaking and some swirls I missed correcting before applying my Avalon king product. How should I go about fixing this or removing it? should I try a polish first? or go to a compound and more aggressive pad? thanks.
Hi Manzar!
Ceramic coatings are the future and well on their way to replacing wax. There is nothing in Armor Shield that could damage your car’s paint. The coating can be removed with polishing compounds if a failed installation occurs.
Hi
I purchase new car. Shall i go for nano ceramic coatings ?
Is there any damage to original paint at the time of application or removal of coating ?
Many thanks for the help
Hi Derek!
That very well may do the trick and is relatively easy to when you are just removing from the wheels. The dirt sticking is a sign of surface tension, not the coating itself (unless of course, the coating was still curing). My suggestion would be to go ahead and polish those wheels and get them as smooth, shiny, and clean as possible and then try again.
Hi Joey!
I would recommend going to it with a fine polish and low abrasive pads. That is really the best way to go about removing an old coating. Every other choice and you either run the disk of eating into your clear coat or missing thicker areas.